Introduction
I’m writing this post to act as a single source of truth for upgrading the Mazda RX8 with an Android Auto / Apple CarPlay head unit. During this whole process, it was hard to find any concrete information, as most of the installations and guides I have seen online have been for Series I RX8’s.
Although these were helpful to piece together different pieces of the puzzle, the information available for Series II’s felt a bit lacking.
I specifically have the R3, but this should also apply to other Series II RX8’s, and may even be helpful if you’re a Series I owner.
I also wanted to take the opportunity to talk about my motivations for this project, but if you want to skip all of that and get straight to the details, click here.
The need to upgrade
I love driving my 2009 Mazda RX8 R3. However, recently it left me stranded when the clutch blew up for absolutely no reason.
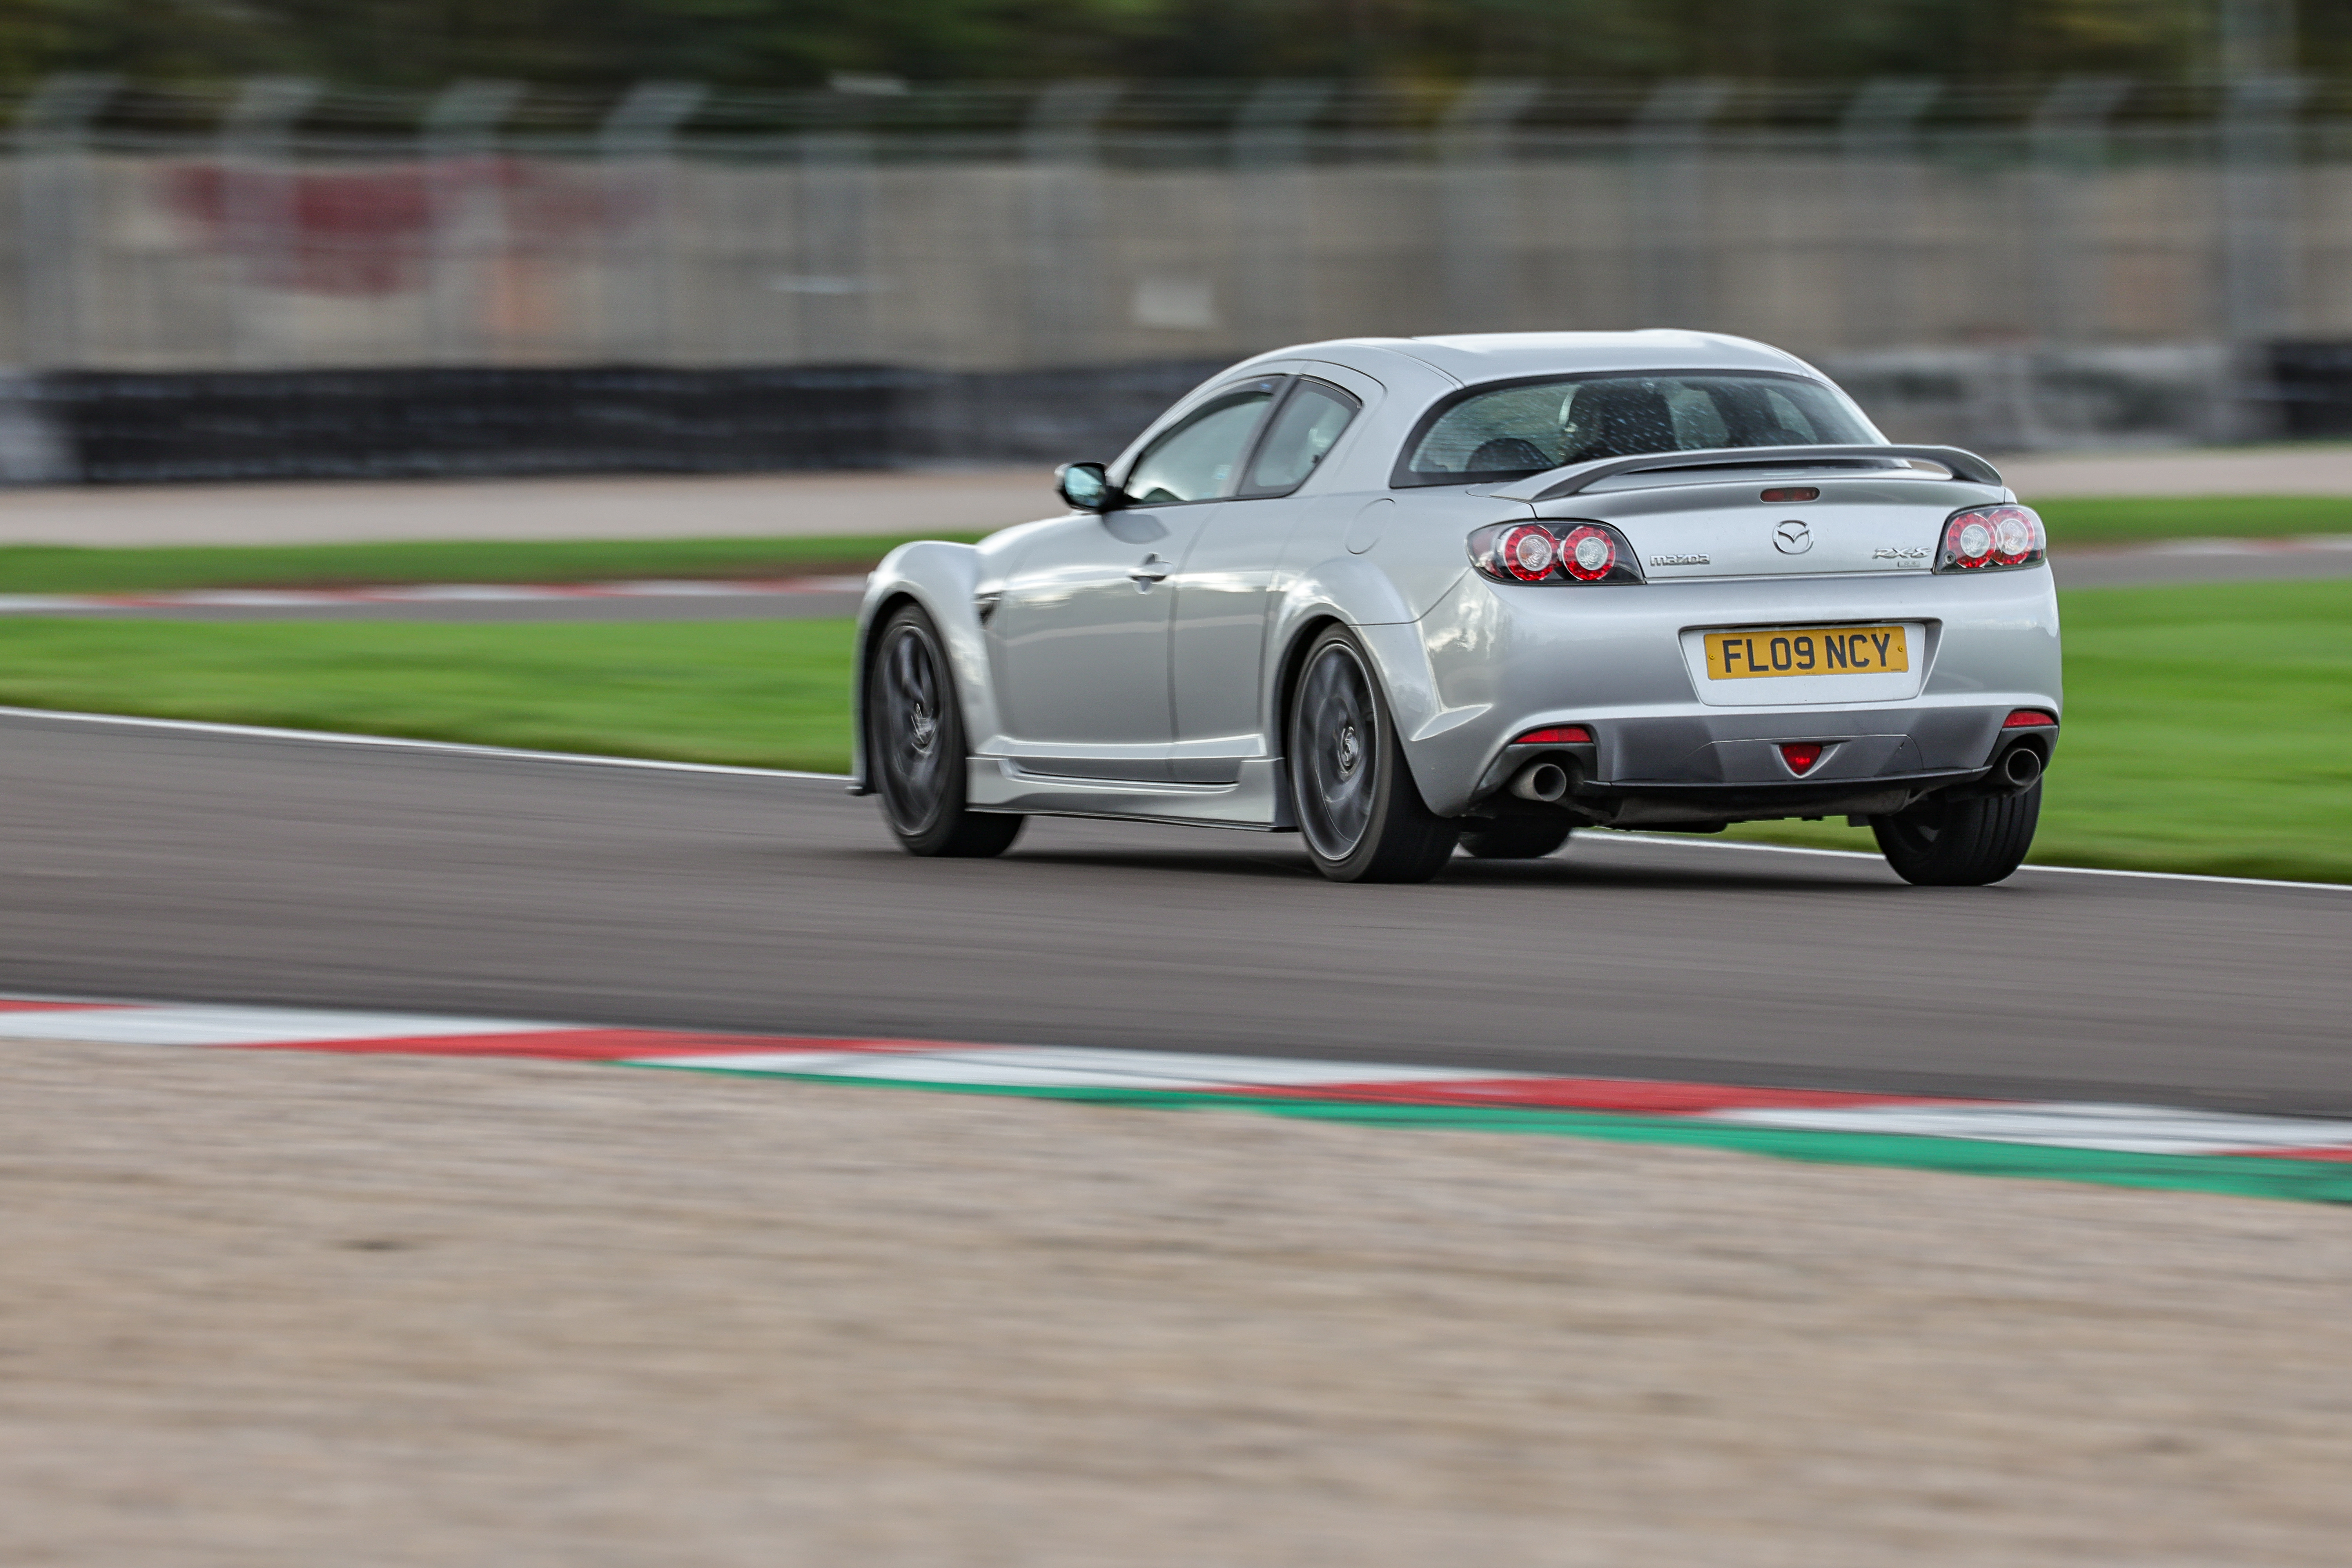
The track day I took it on for my birthday definitely had nothing to do with it.
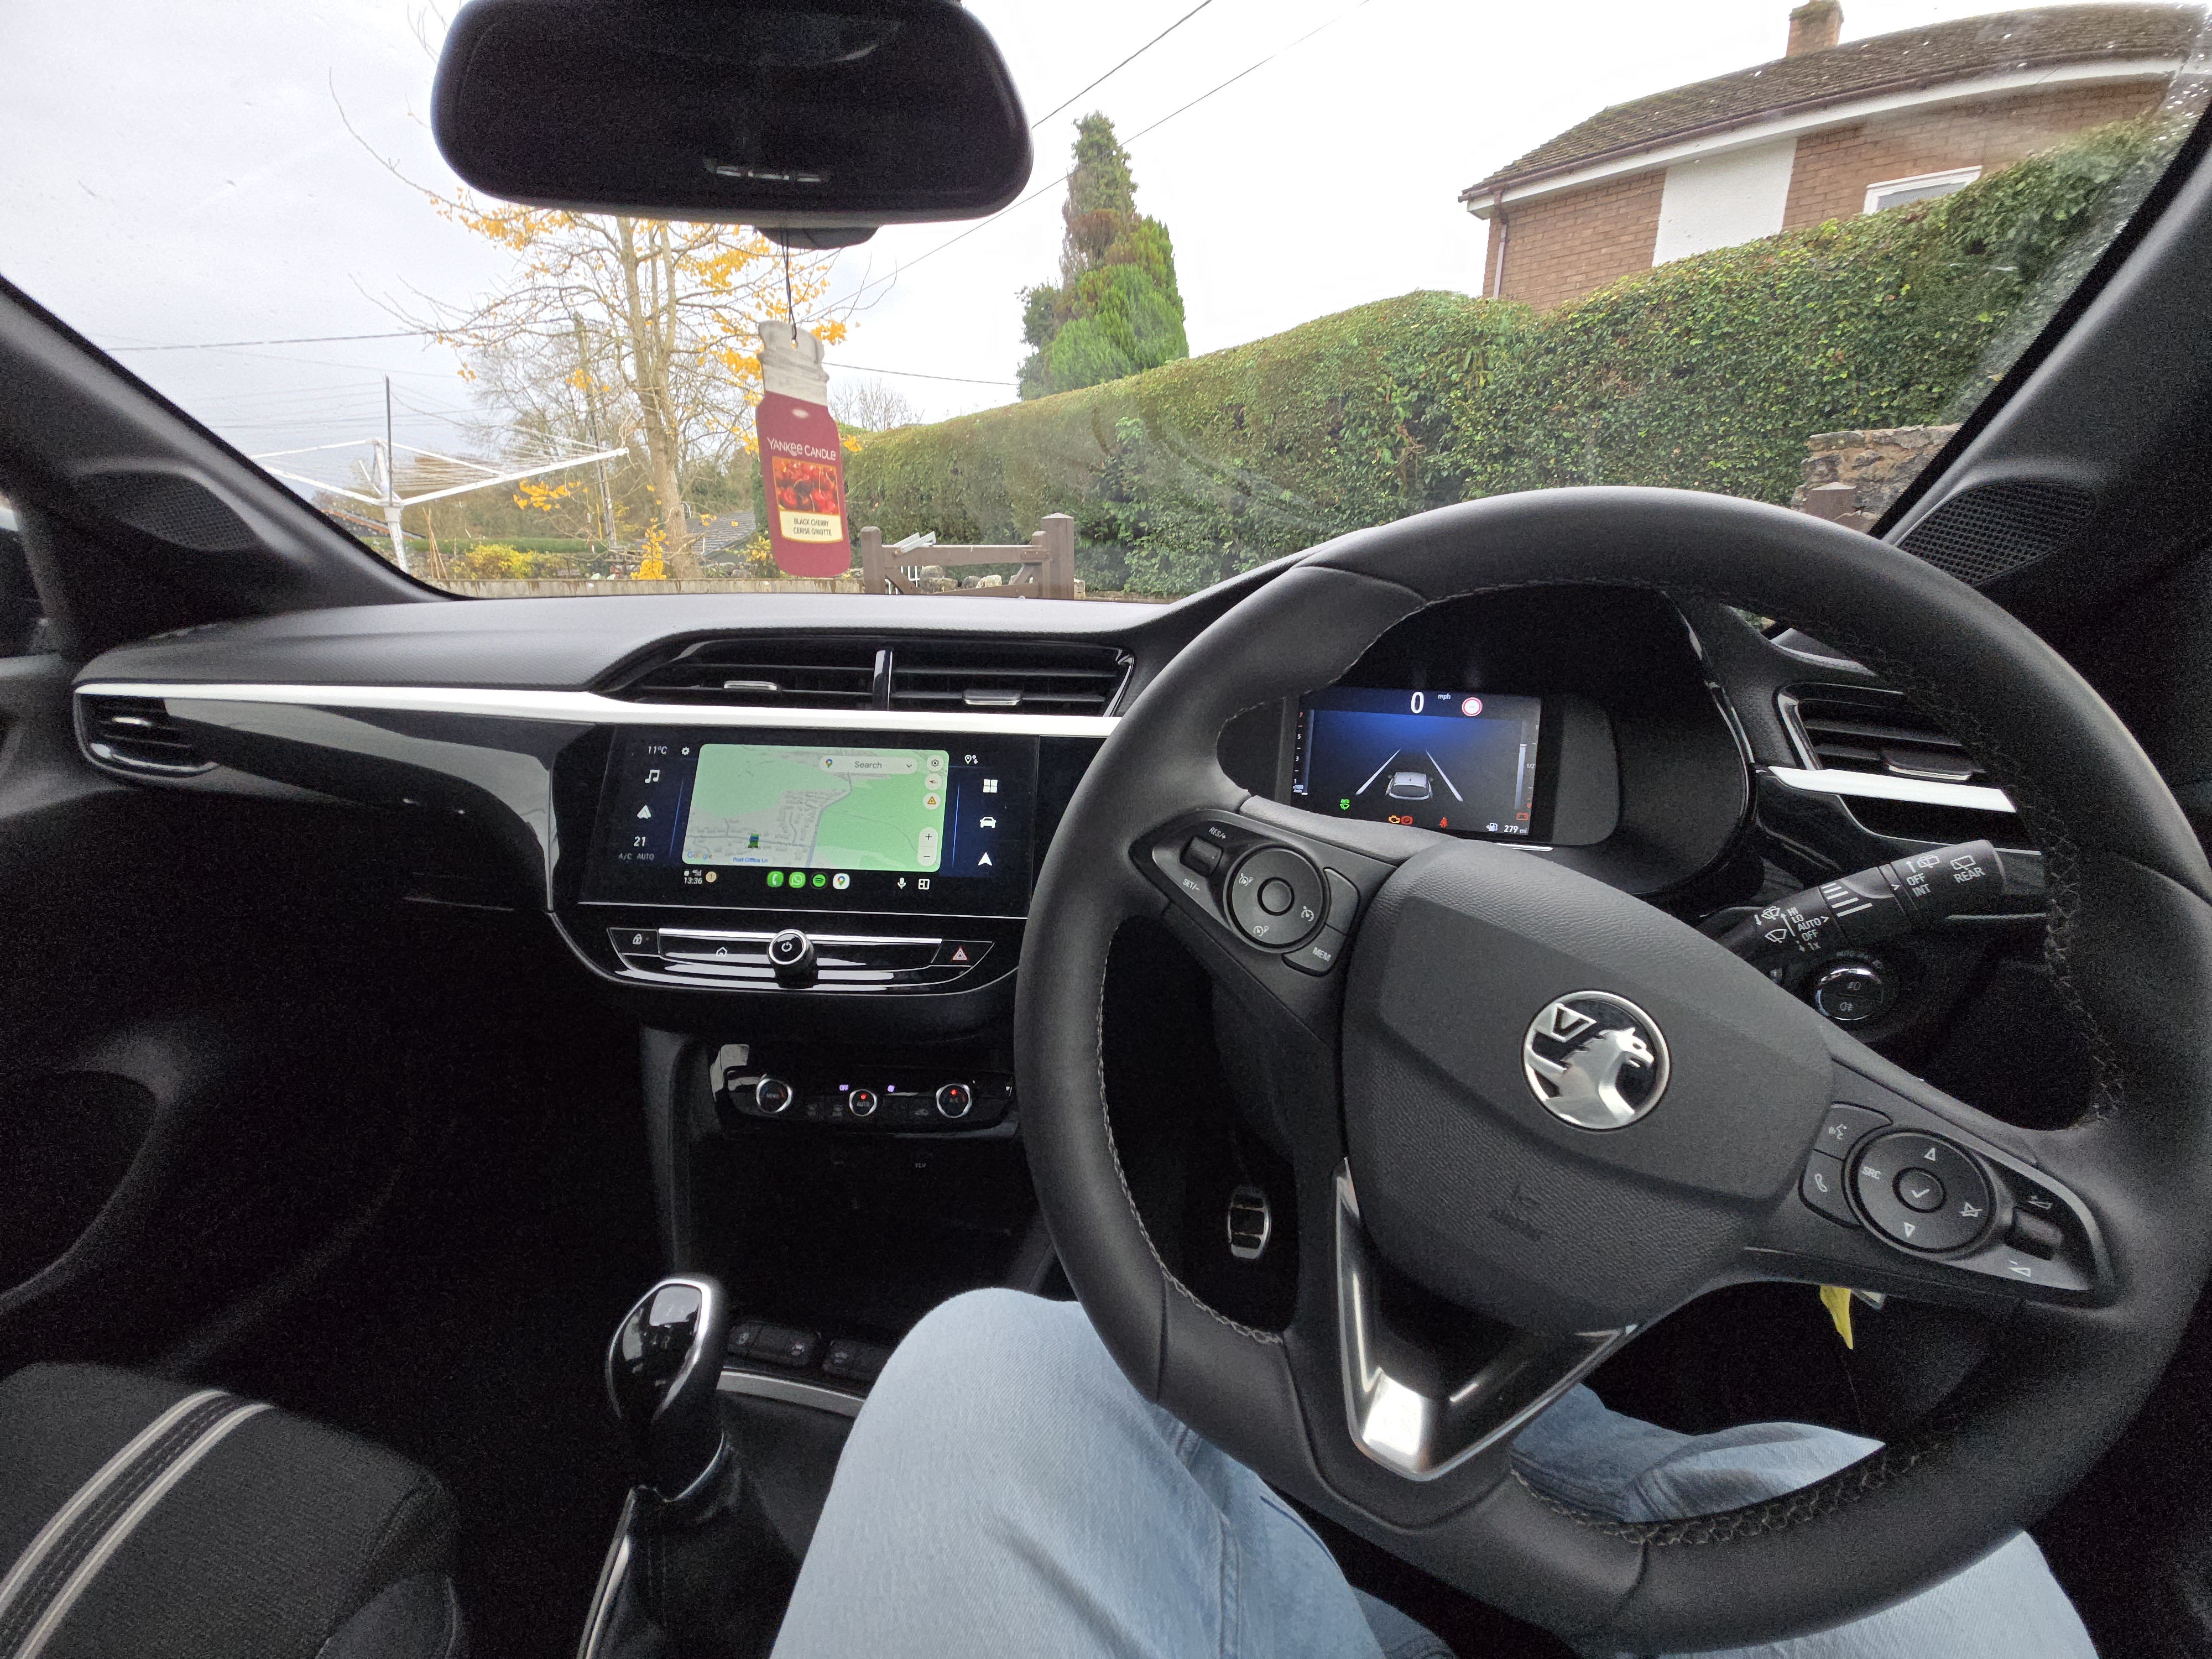
Unfortunately, this left me without the car for a few weeks while parts were sourced and the car was fixed. As such, I needed to get a hire car to continue getting around. That’s when I discovered the Android Auto capability of the rental, the Vauxhall Corsa.
It was pretty boring to drive. But I loved that when I got in it and turned the key, my phone connected automatically and the familiar Android experience was right there on screen, with my maps and music ready to go.
After 3 long weeks, and a hefty repair bill, my RX8 was back in my hands with a fresh clutch and felt like a new car. That first drive back home was fantastic… Except for the annoying procedure to get my phone set up and ready to go again.
- Turn the car on
- Unfold my phone for max screen size, open up Spotify, start playing a song
- Open up Google Maps, type in my destination and start navigation
- Tap the button on my phone mount, wait for it to expand wide enough to hold my stupid phone
- Put the phone in, making sure it’s not the wrong way up, or the weight of it will ensure the volume buttons get pressed
- Wait for the phone mount to close
- Start driving
- Hope it doesn’t fall out when driving hard
There were also some other limitations. While my RX8 does allow you to connect your phone with Bluetooth, it’s only possible to make calls with it.
To play music, I need to use a separate adapter which plugs into the Aux port, which consequently means I can’t use the steering-wheel controls for stuff like skipping songs.
I found myself, for a brief moment, missing the Corsa. Well, only the Android Auto experience.
Time to upgrade
A while ago, I stumbled across this Reddit post from /u/Jongpoole, featuring the Seicane H5579N, and I really liked the way it looked in the car. It seemed like a much better solution than finding a double-din fascia conversion and putting in a regular display. It looks way nicer, and the screen is much bigger, making it feel like a more OEM+ upgrade.
The comments there mentioned some modifications required to make it play nicely with the Bose system in the RX8. But, after finding this more up-to-date Seicane head unit and seeing that it was more plug and play, I felt confident enough to pull the trigger.
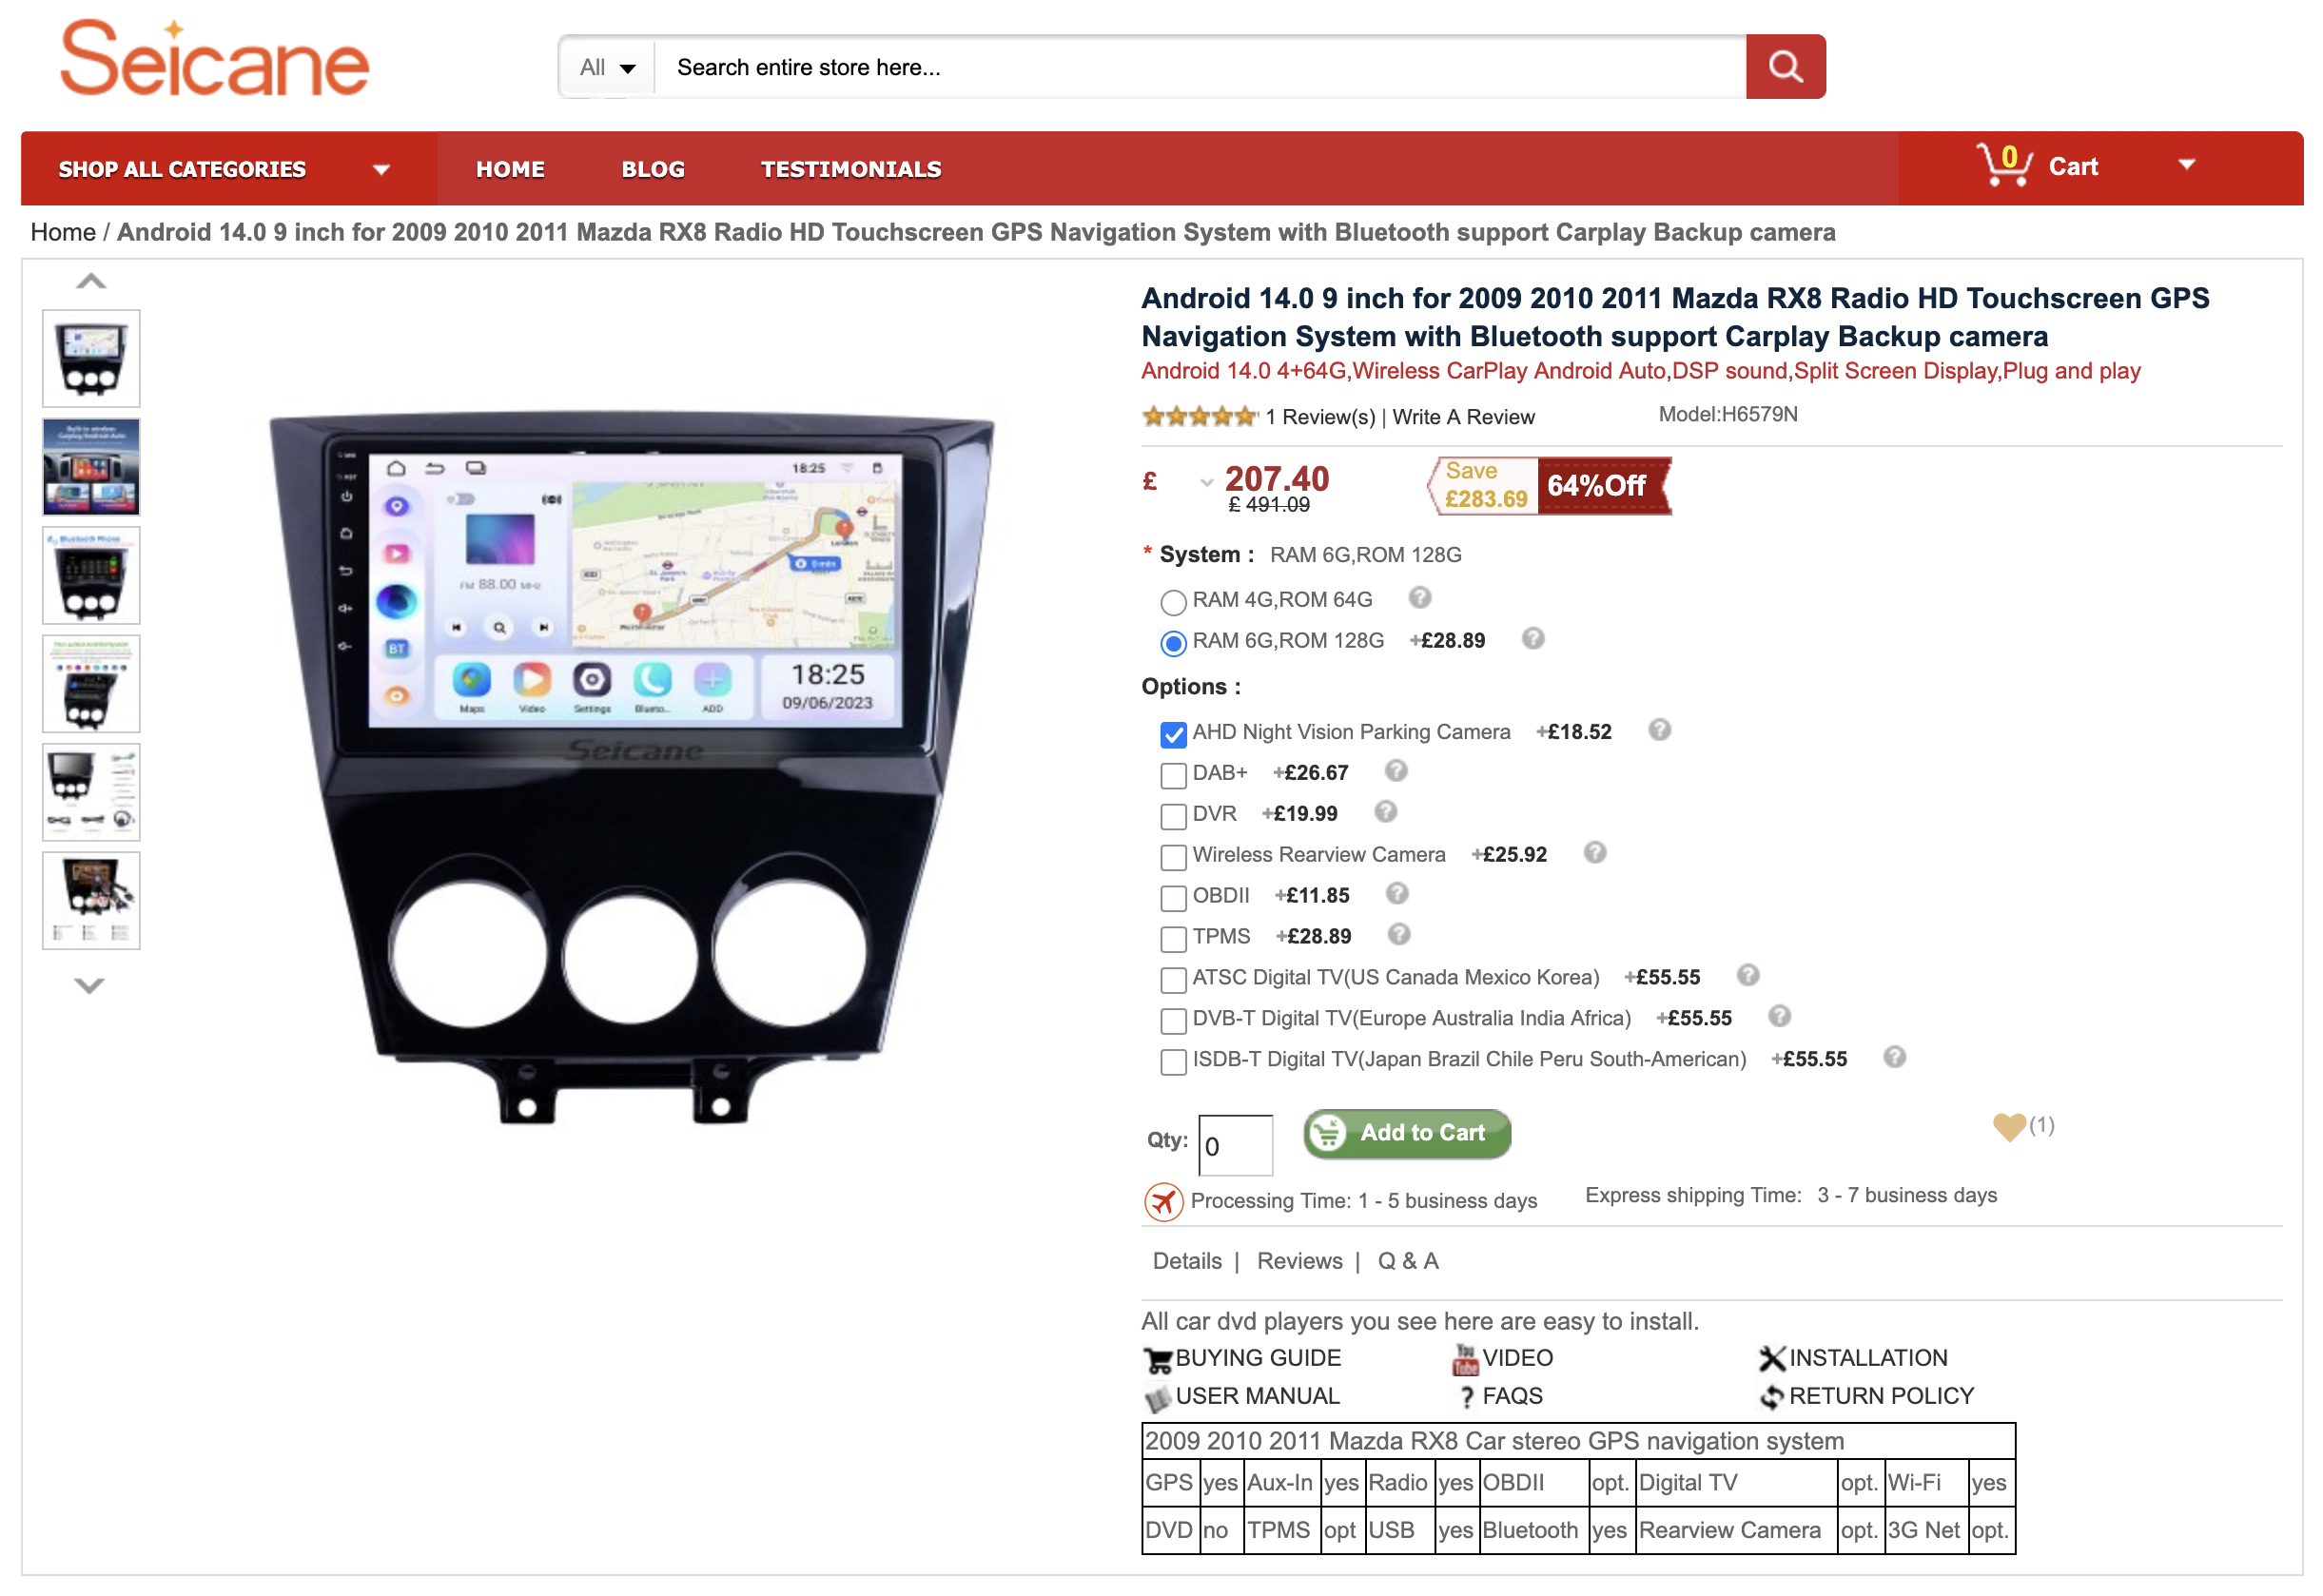
I opted for the 6G RAM, 128GB ROM model with a reversing camera. It took a few weeks to arrive, and then it was time to get to work!
Removing the existing head unit
For this, you will need to gather some tools. I recommend grabbing:
- A cross-head screwdriver, preferably with a magnetic bit
- A flat-head screwdriver (not pictured)
- Some plastic trim pullers
- A ratchet and extension bar, I used a 1/4”
- 10 mm socket

Step 1: Remove the gear knob and boot
Remove the gear knob by grabbing it and twisting it anti-clockwise. It may be stiff at first, but give it some force, and it will start to turn and get easier to unscrew.
After removing the knob, grab your plastic trim puller and start prying up the plastic panel where the gear shift boot is attached. Start from the end closest to the cupholders, picking either side. Insert your trim puller and pry up gently to release the clips, moving forwards towards the ashtray until all clips on both sides are released.
Then, gently pull up on the trim and maneuver it around the handbrake to reveal the transmission tunnel.
Step 2: Remove the ashtray
Now, remove the two cross-head screws at the base of the ashtray. There is one on each side, revealed after removing the plastic panel for the shift boot.
After these are removed, open the ashtray lid and pull up from the bottom. There are some clips holding it in, which will release the ashtray when pulling up and out from the bottom.
Be careful not to pull too hard, as there are some plugs connected for the cigarette lighter and the courtesy light inside. You should have enough room to pull the ashtray out to reveal these.
First, disconnect the cigarette lighter plugs. These should come out by pinching the connector on the top and bottom, ensuring you’re pressing down the retaining clip.
Next, you can remove the bulb using a flat-head screwdriver. Place the screwdriver along the top of the white plastic housing and gently pry upwards, which will pop the housing towards you.
Step 3: Unscrew the head unit
There are two screws and one bolt holding in the head unit. The two screws are located just behind where the ashtray compartment used to be. Unscrew these and keep them in a safe place.
Next, you need to stick your head under the steering wheel. There’s a piece of plastic trim which first needs to be removed, which is a U-shape. Pull from the top towards you to release the clips, then lift it up and out to unclip it from the bottom.
In the gap you’ve now created, look inside towards the center console. You should see a 10 mm bolt which you need to unscrew. You’ll see a few bolts in there, but the silver bolt with an “R” stamped into the metal to the left of it is the one you’re after.
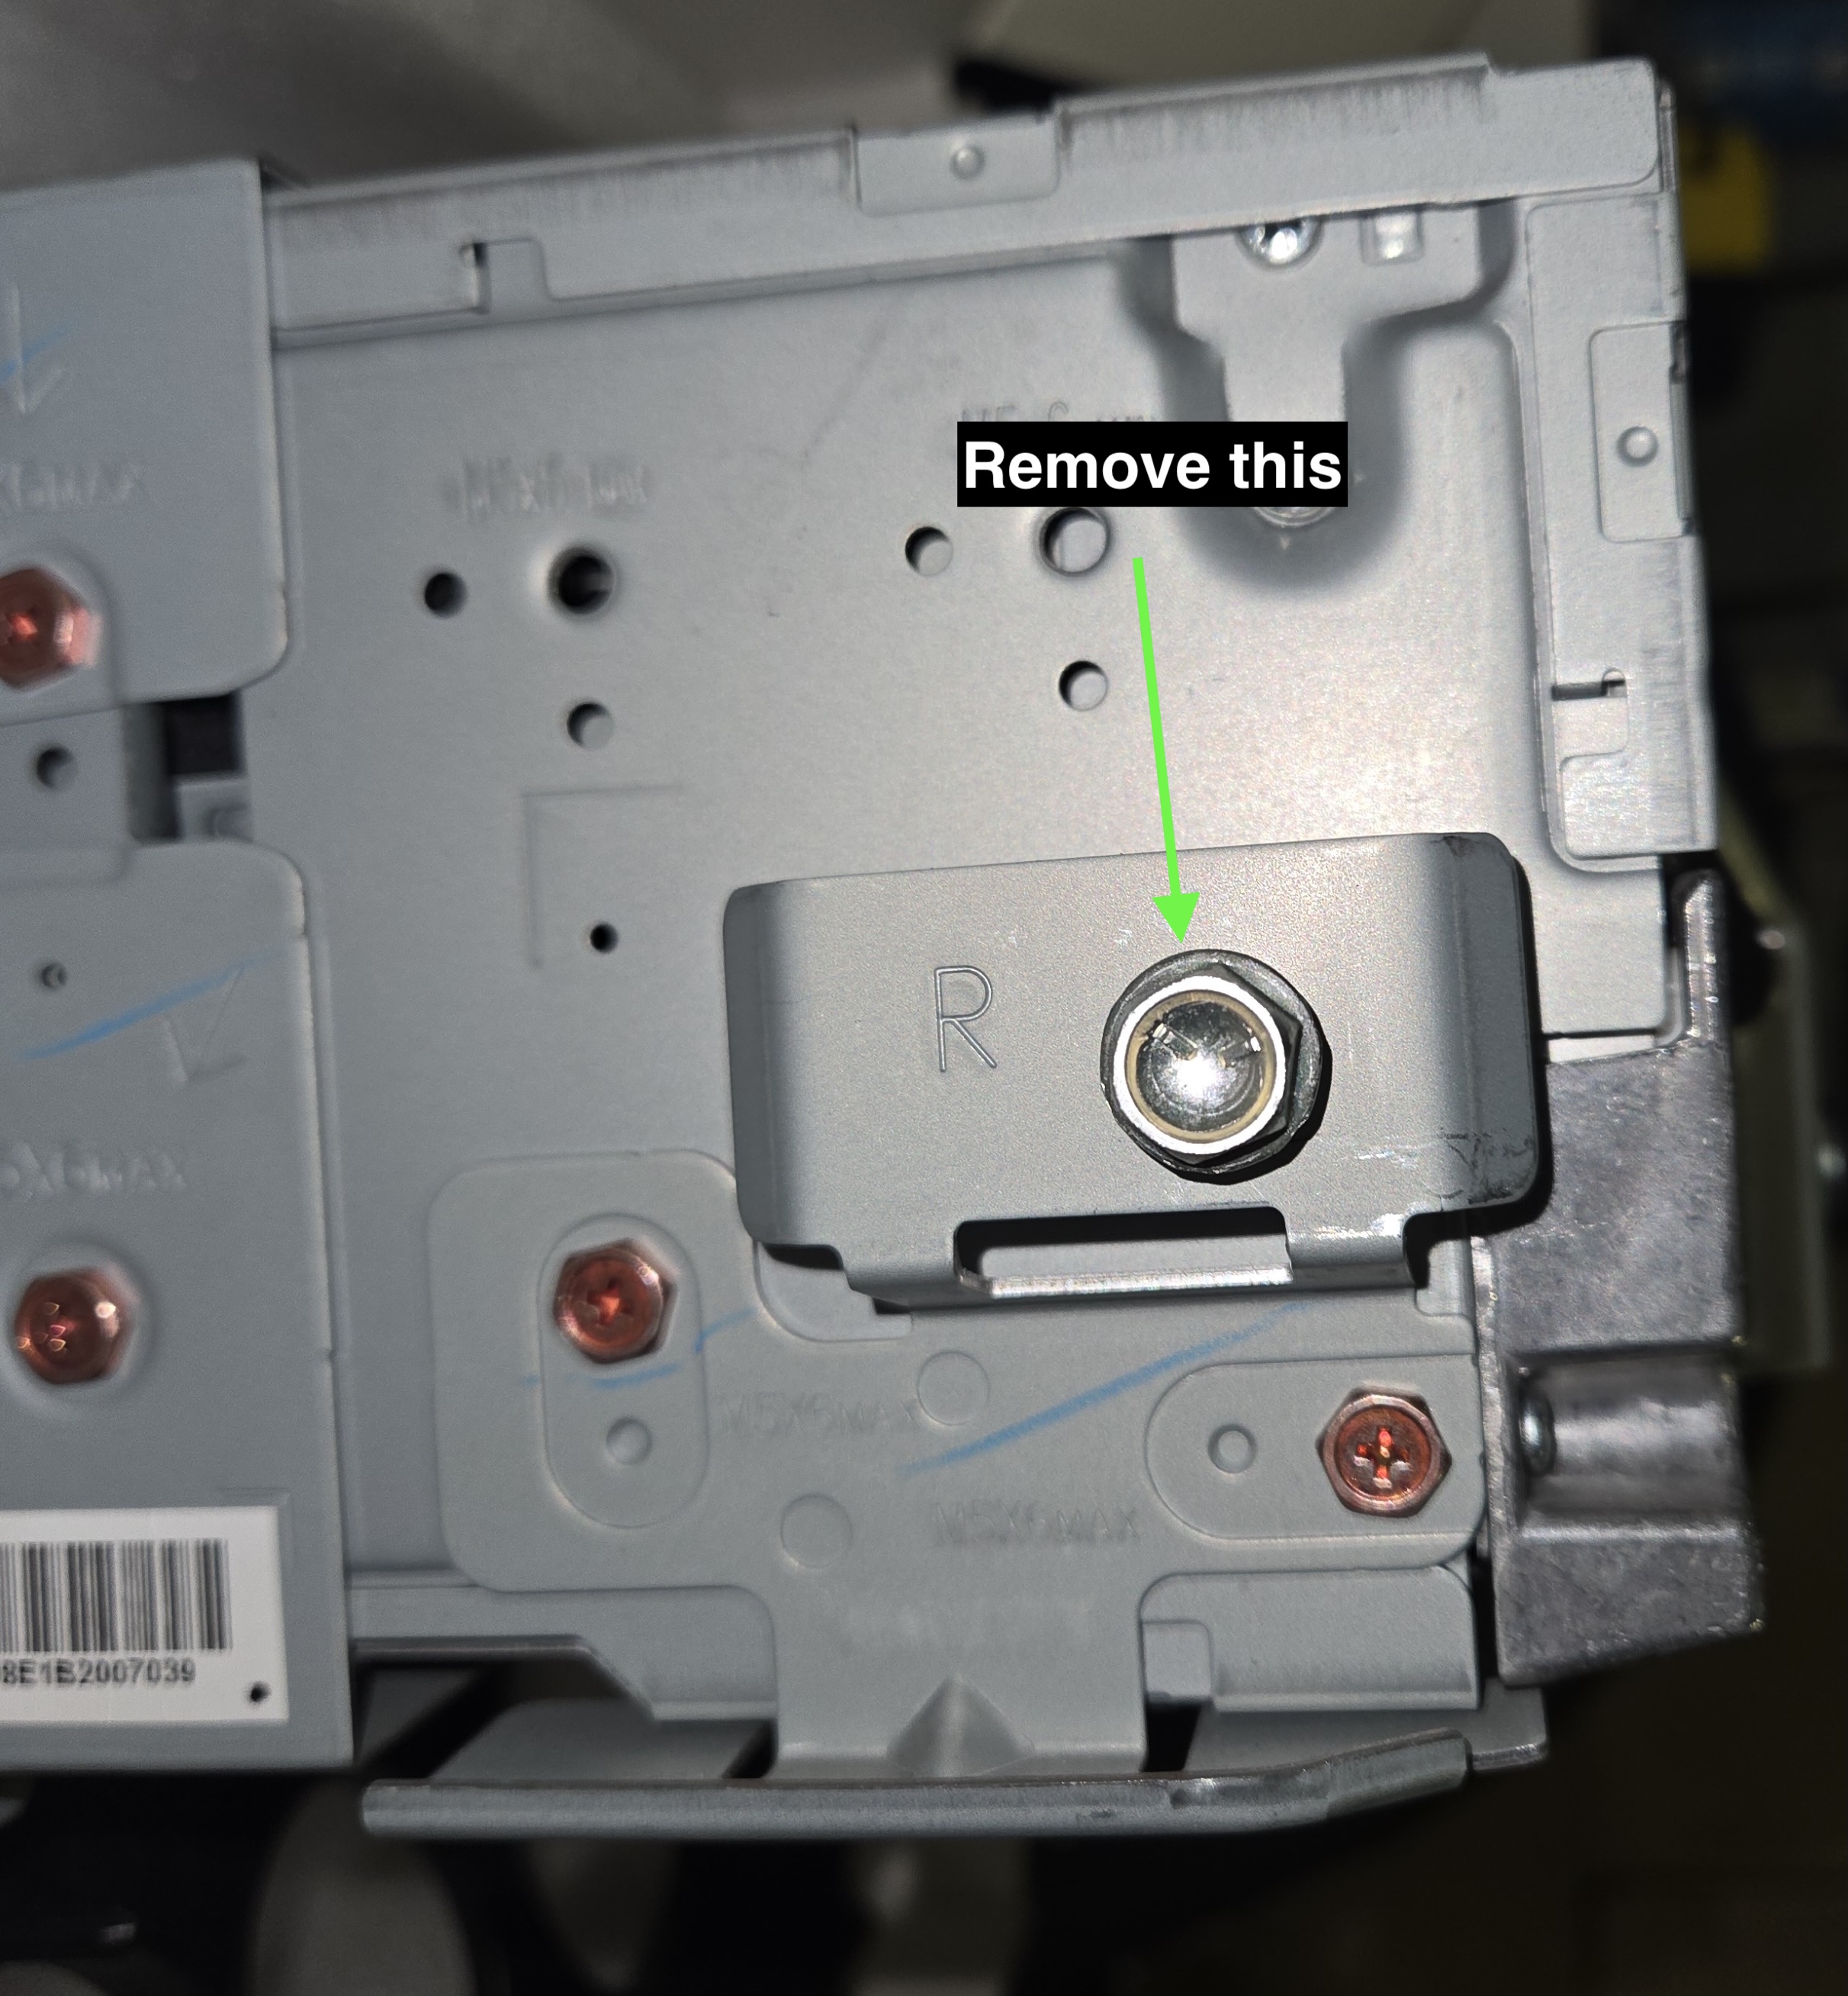
Using your ratchet, extension and 10 mm socket, reach in and remove the bolt. A torch also helps at this stage to help you locate it.
Step 4: Slide out the head unit
Now the head unit is only held in by clips, we can start to pull it out and away from the center console.
The head unit has clips on the left and right-hand side towards the bottom and three at the top. I pulled the unit from the bottom, again being careful as there are wires in place we don’t want to rip out. After pulling from the bottom towards you, it should begin to pop out.
Then, use the plastic trim tools to work your way up the sides of the unit, gently prying the tool towards the top to release the top corner. After a top corner is released, work your way along the top to release the top-middle clip and the final clip in the corner.
You should now be able to pull the unit from the top and bottom, pulling towards you. It may need a bit of force to finish unclipping and a bit of wiggling to free it from the metal rails that guide it into position.
Pull it out, gently, far enough so you can reach your hands inside.
Step 5: Remove the Air Conditioning controls connector
At the bottom of the unit, there’s a single plug that connects to the controls. Pinch and pull away from you to release it.
I found this part very tedious and annoying. Don’t be tempted to stick a screwdriver in there to help, as you risk slipping and causing damage to the wiring.
I was able to wiggle and tilt the unit enough where I could more easily see the connector to gauge where to pinch, but I found it tricky and this took me a while.
Step 6: Remove the main head unit connectors
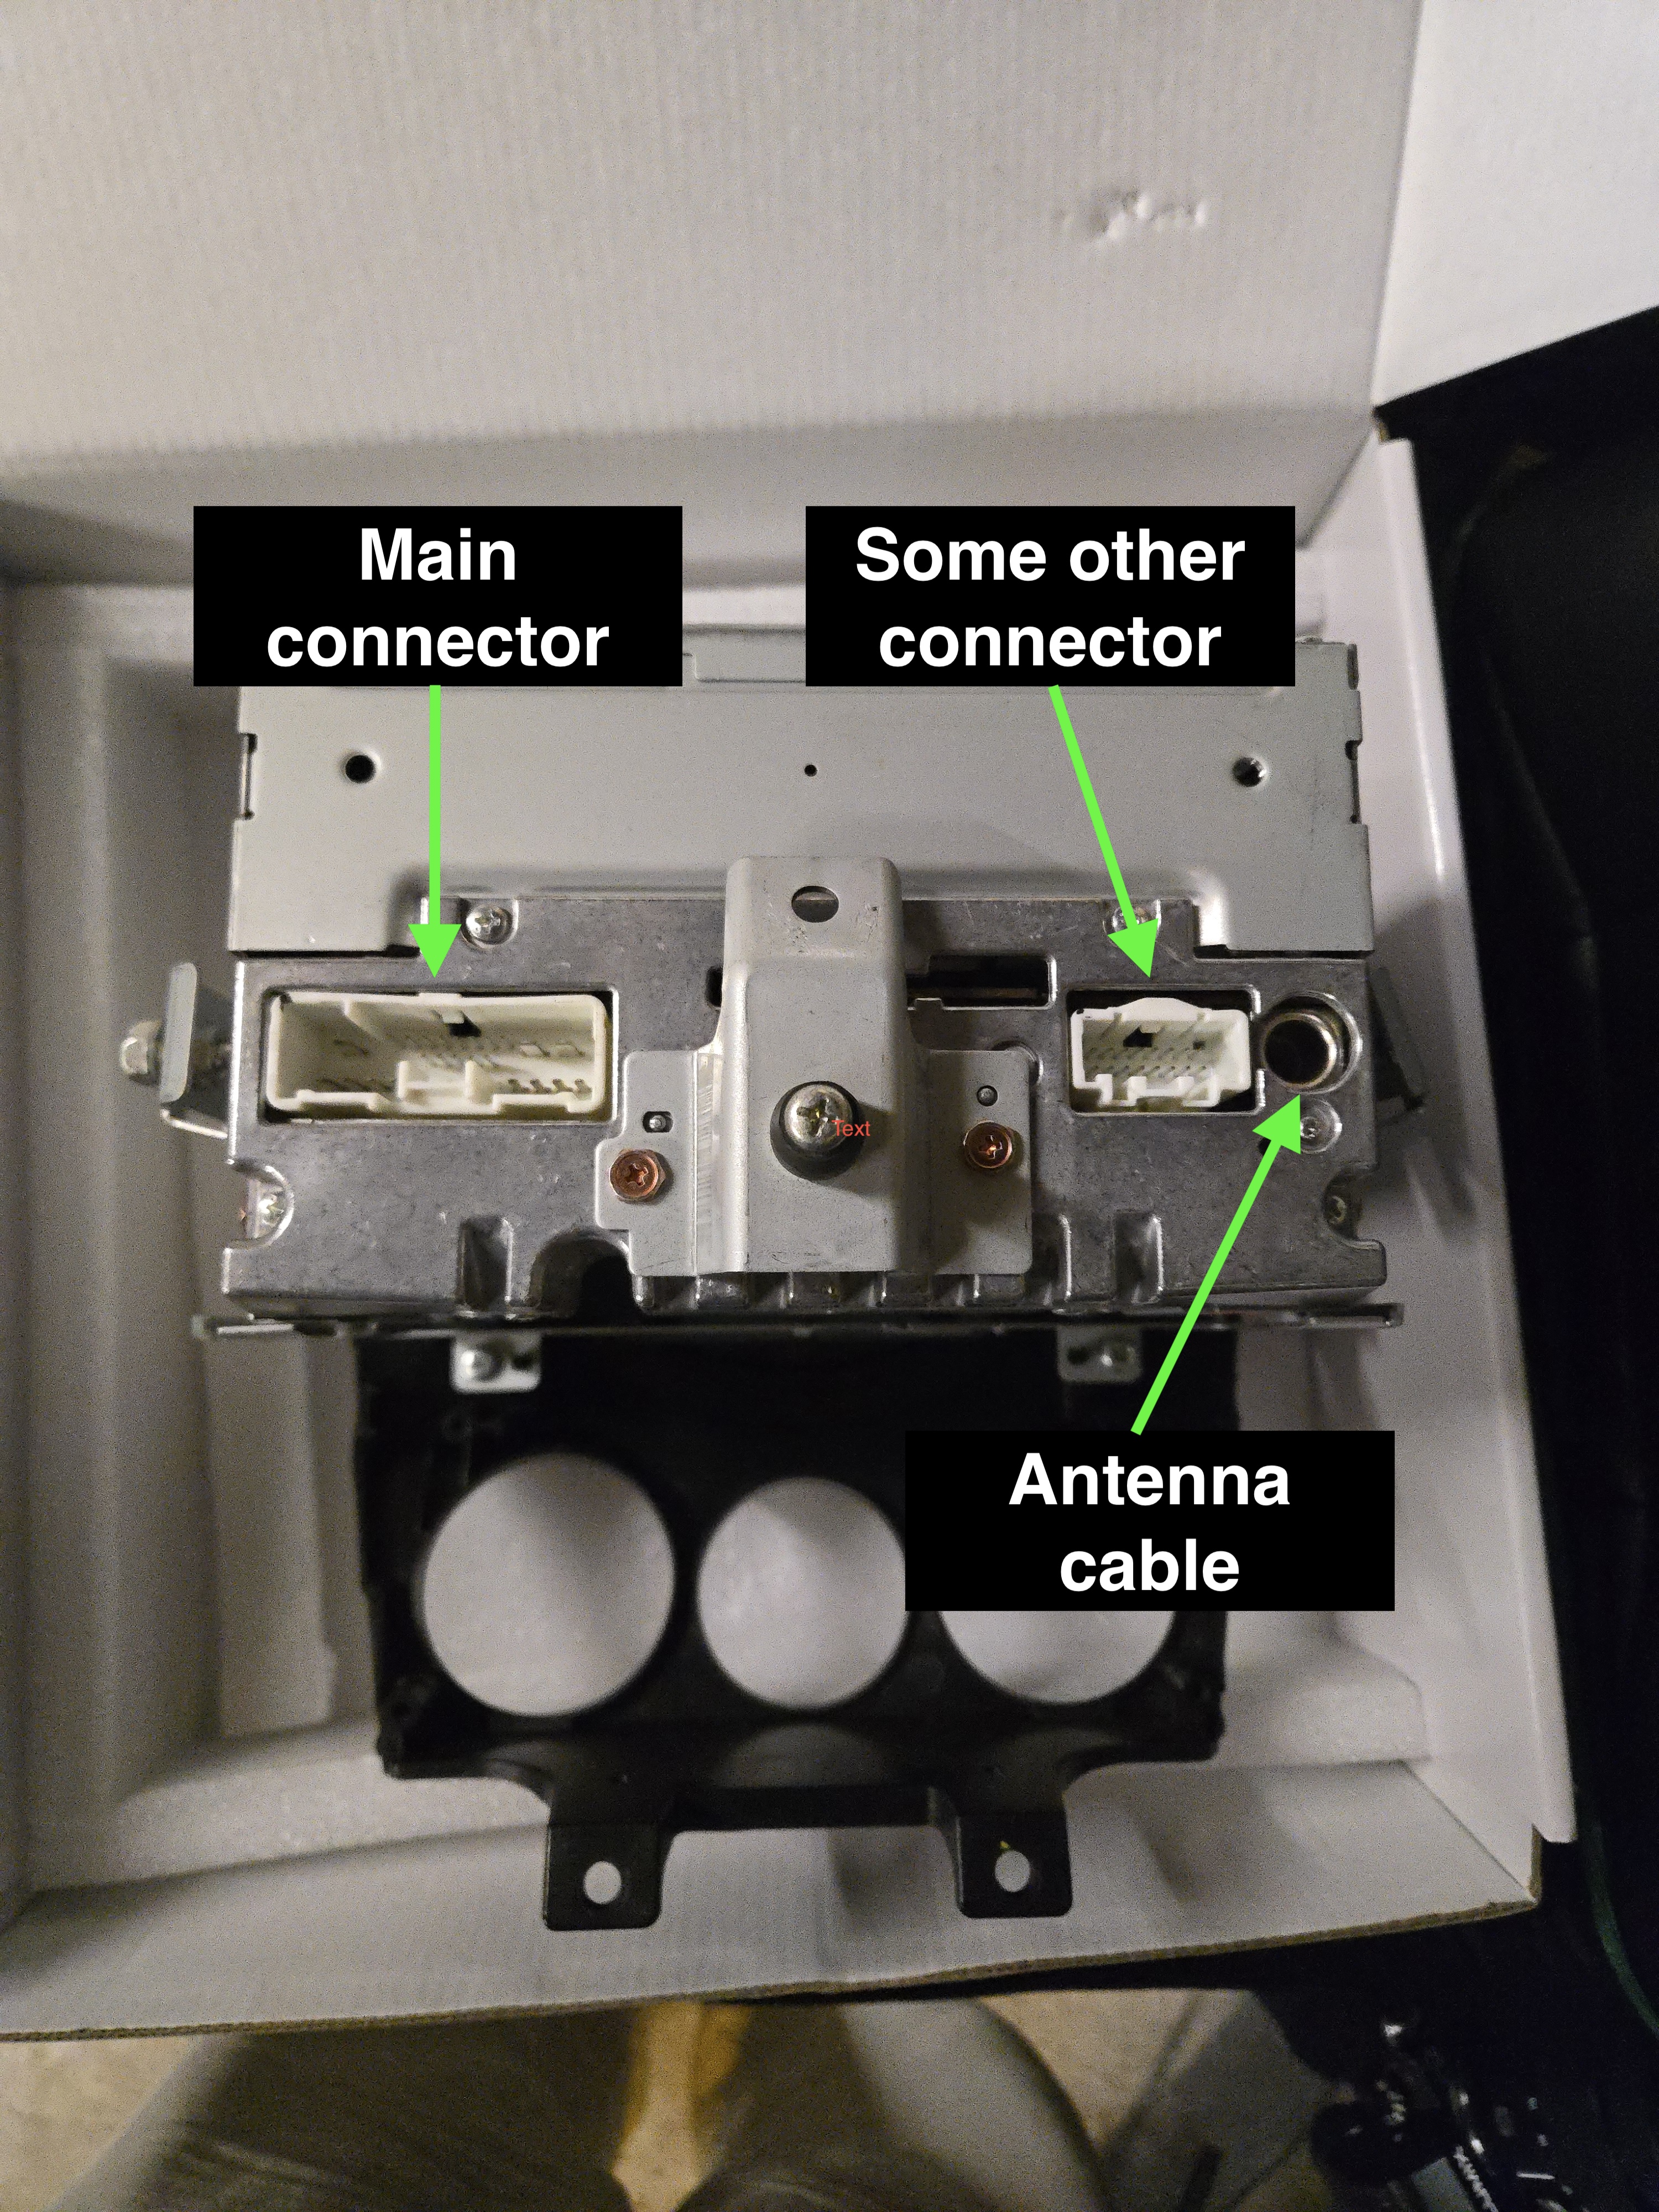
There are now three things that need to be removed:
- The radio antenna cable. This is at the top-left of the unit and simply pulls out. This was stiffer than I expected but didn’t require anything more than a confident tug.
- The main loom connector. This is the flat and wide connector on the right-hand side, which requires a pinch in the middle and a pull backwards.
- The other connector. I have no idea what this is, but it’s a connector on the left-hand side, which also requires a pinch in the middle and a pull backwards.
I also found these quite tricky, but remember, patience is key. Don’t stick a screwdriver in there, as you’ll probably break stuff.
At this stage, the head unit should be free to come out, with a bit of maneuvering off the guide rails.

Preparing the new head unit
The instructions bundled with the Seicane unit were very generic, and a bit lacking. This is the included guide, which unfortunately didn’t match the back of the head unit I had in front of me.
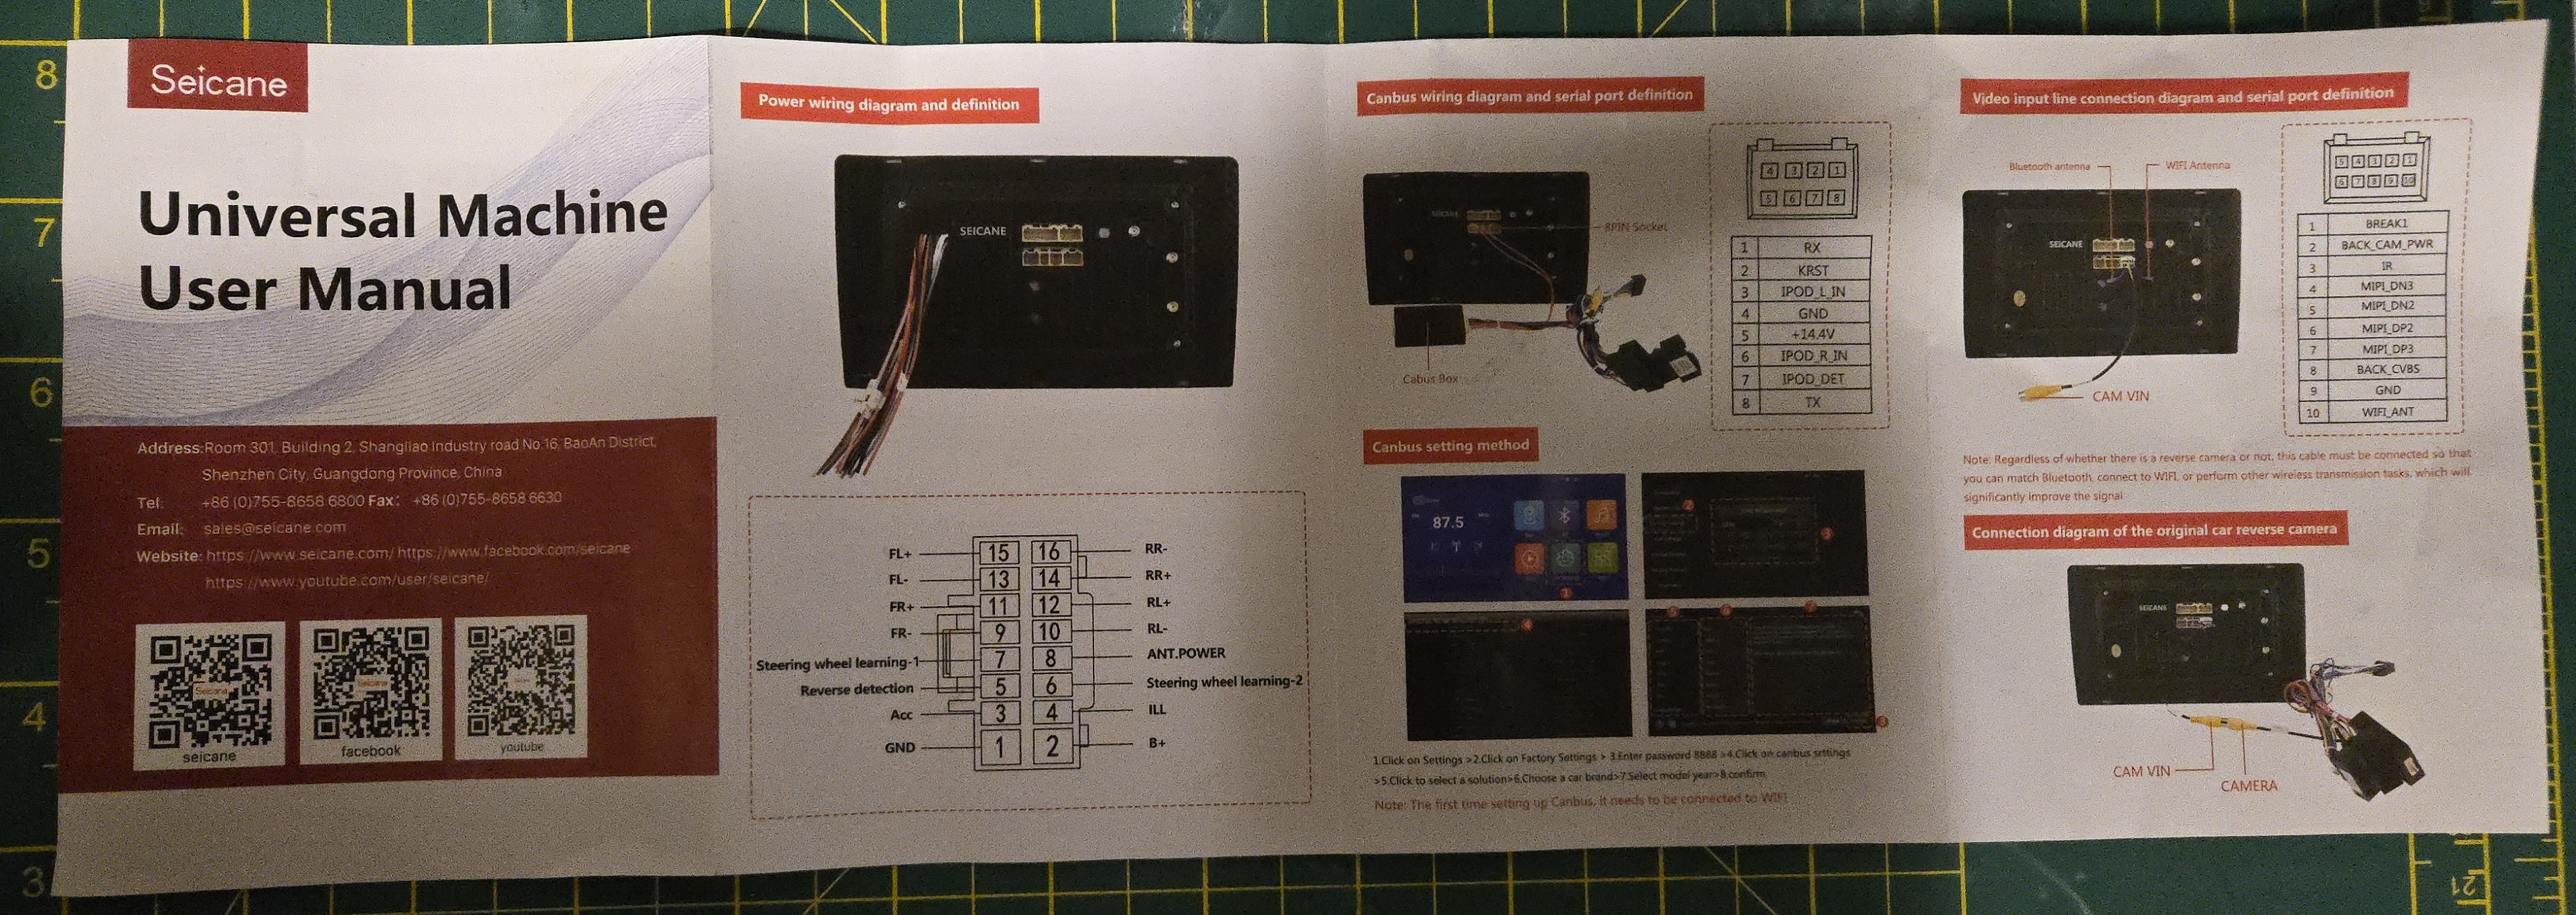
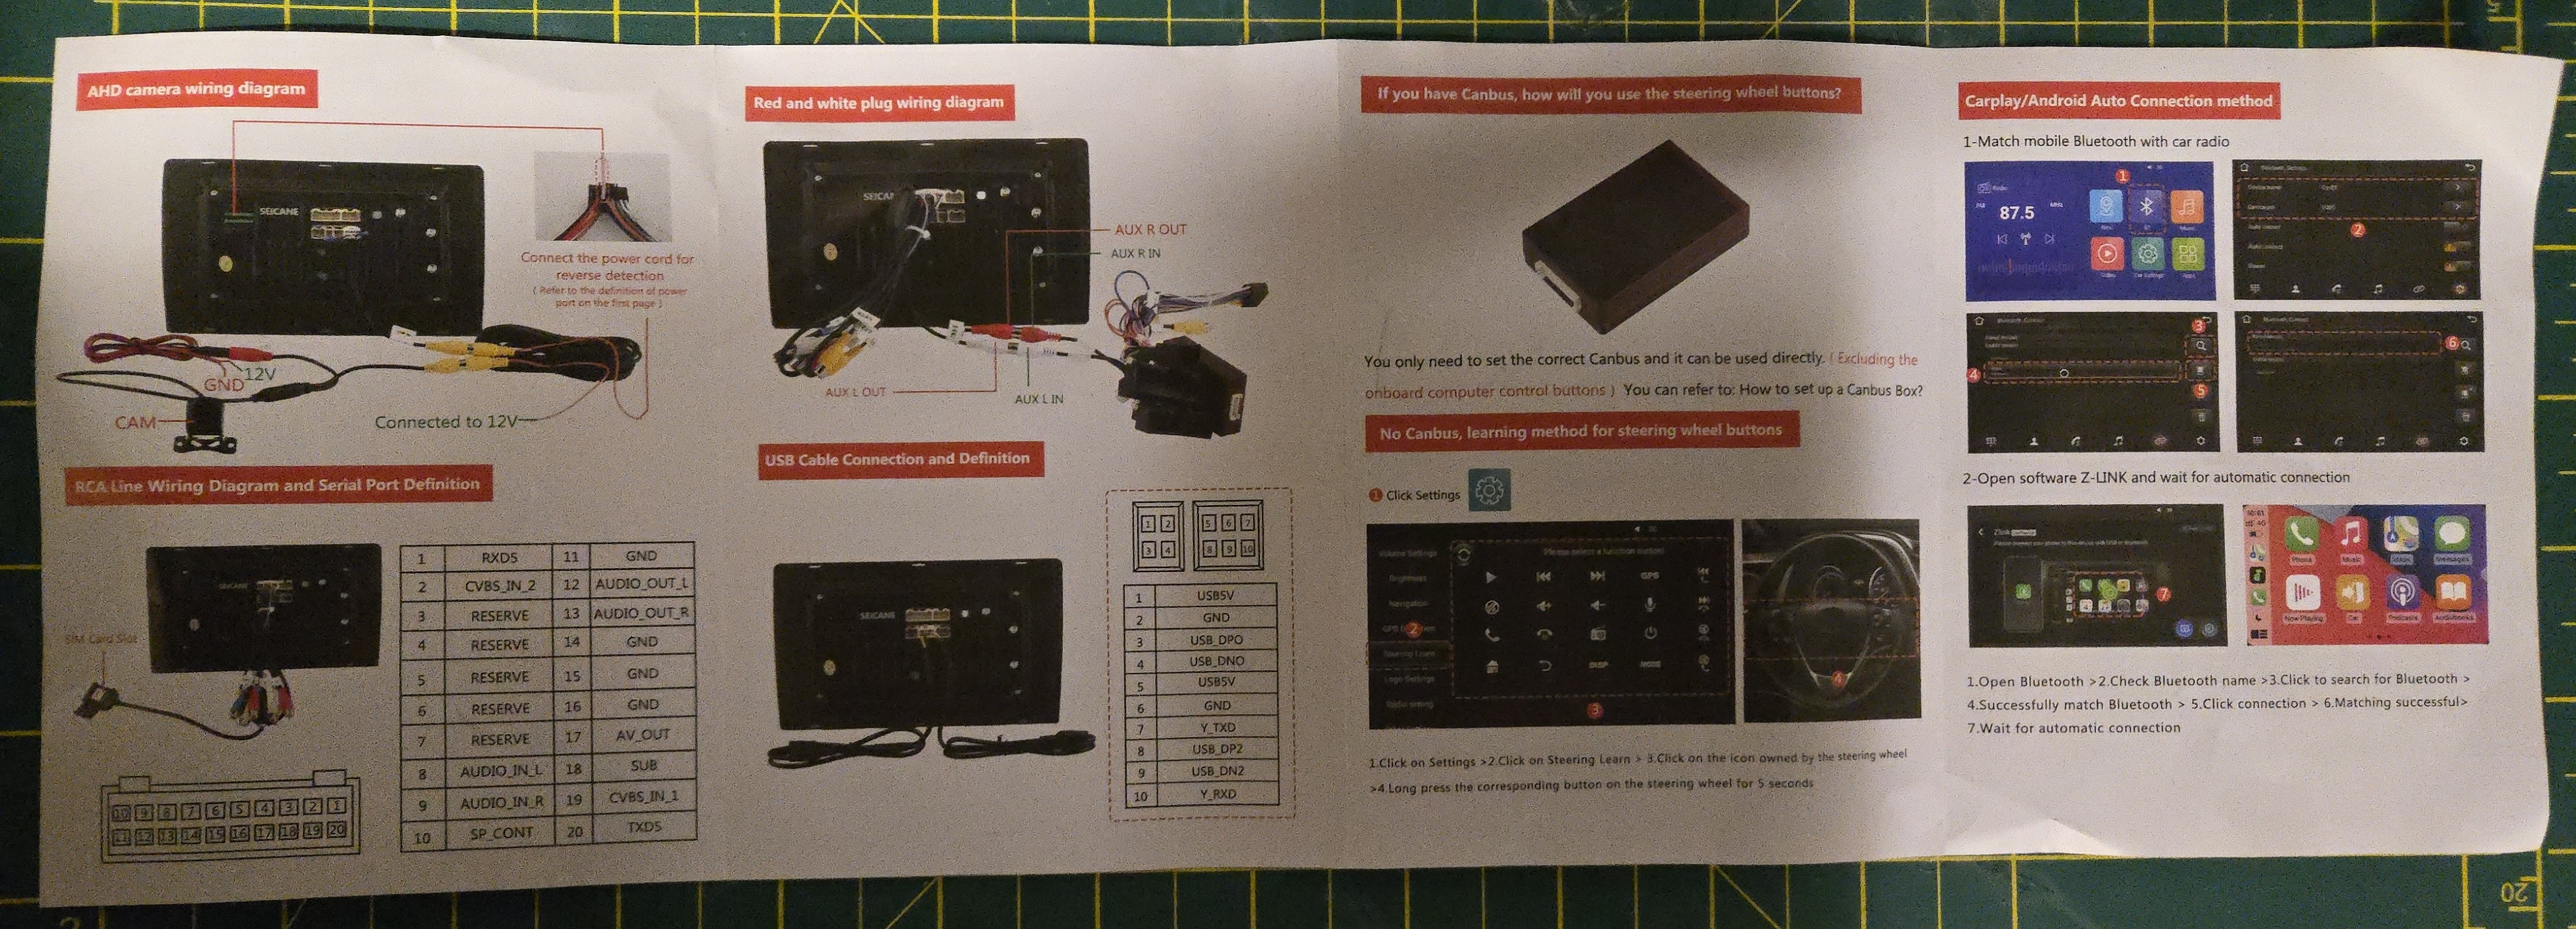
It took a few minutes to decipher what it was showing in the guide, and relating that to what ports I actually had available. Luckily, the ports themselves were the same, so it was just a case of finding the ports which matched the connectors in the various cable looms they provide.
Connecting the included cables
The key steps at this stage are:
- Connect the main loom adapter, which will later be connected to the main plug from the RX8.
- Connect the CAN bus module.
- Connect the GPS and 4G data modules.
You may have other things depending on what you ordered. For example, I also had a backup camera to plug in, which had its own instructions.
Transferring parts from the OEM head unit
We’ll need to transplant some parts from the OEM head unit for a successful installation.
Air conditioning controls
First, remove the bolts and screws holding in the air conditioning controls. My unit had some retaining brackets included that needed to be removed before unscrewing the controls.
Now, you should be able to lift the control unit out of the OEM head unit. Line this up with the pegs and screw holes on the new head unit, and use the screws you just removed from the OEM unit to screw it in place.
I recommend inserting the screws in a cross-pattern to ensure proper alignment. For example:
- Start with the top-left screw
- Then the bottom right
- Then the top right
- Then the bottom left
I also wouldn’t tighten them all the way, you just want to get them snug. Now you can clip the unit over and ensure all the buttons press in without catching, and the dials turn smoothly. On my first attempt, the top button of the center controls stuck when I pressed it in, so I had to unscrew slightly and adjust the alignment before re-tightening the screws.
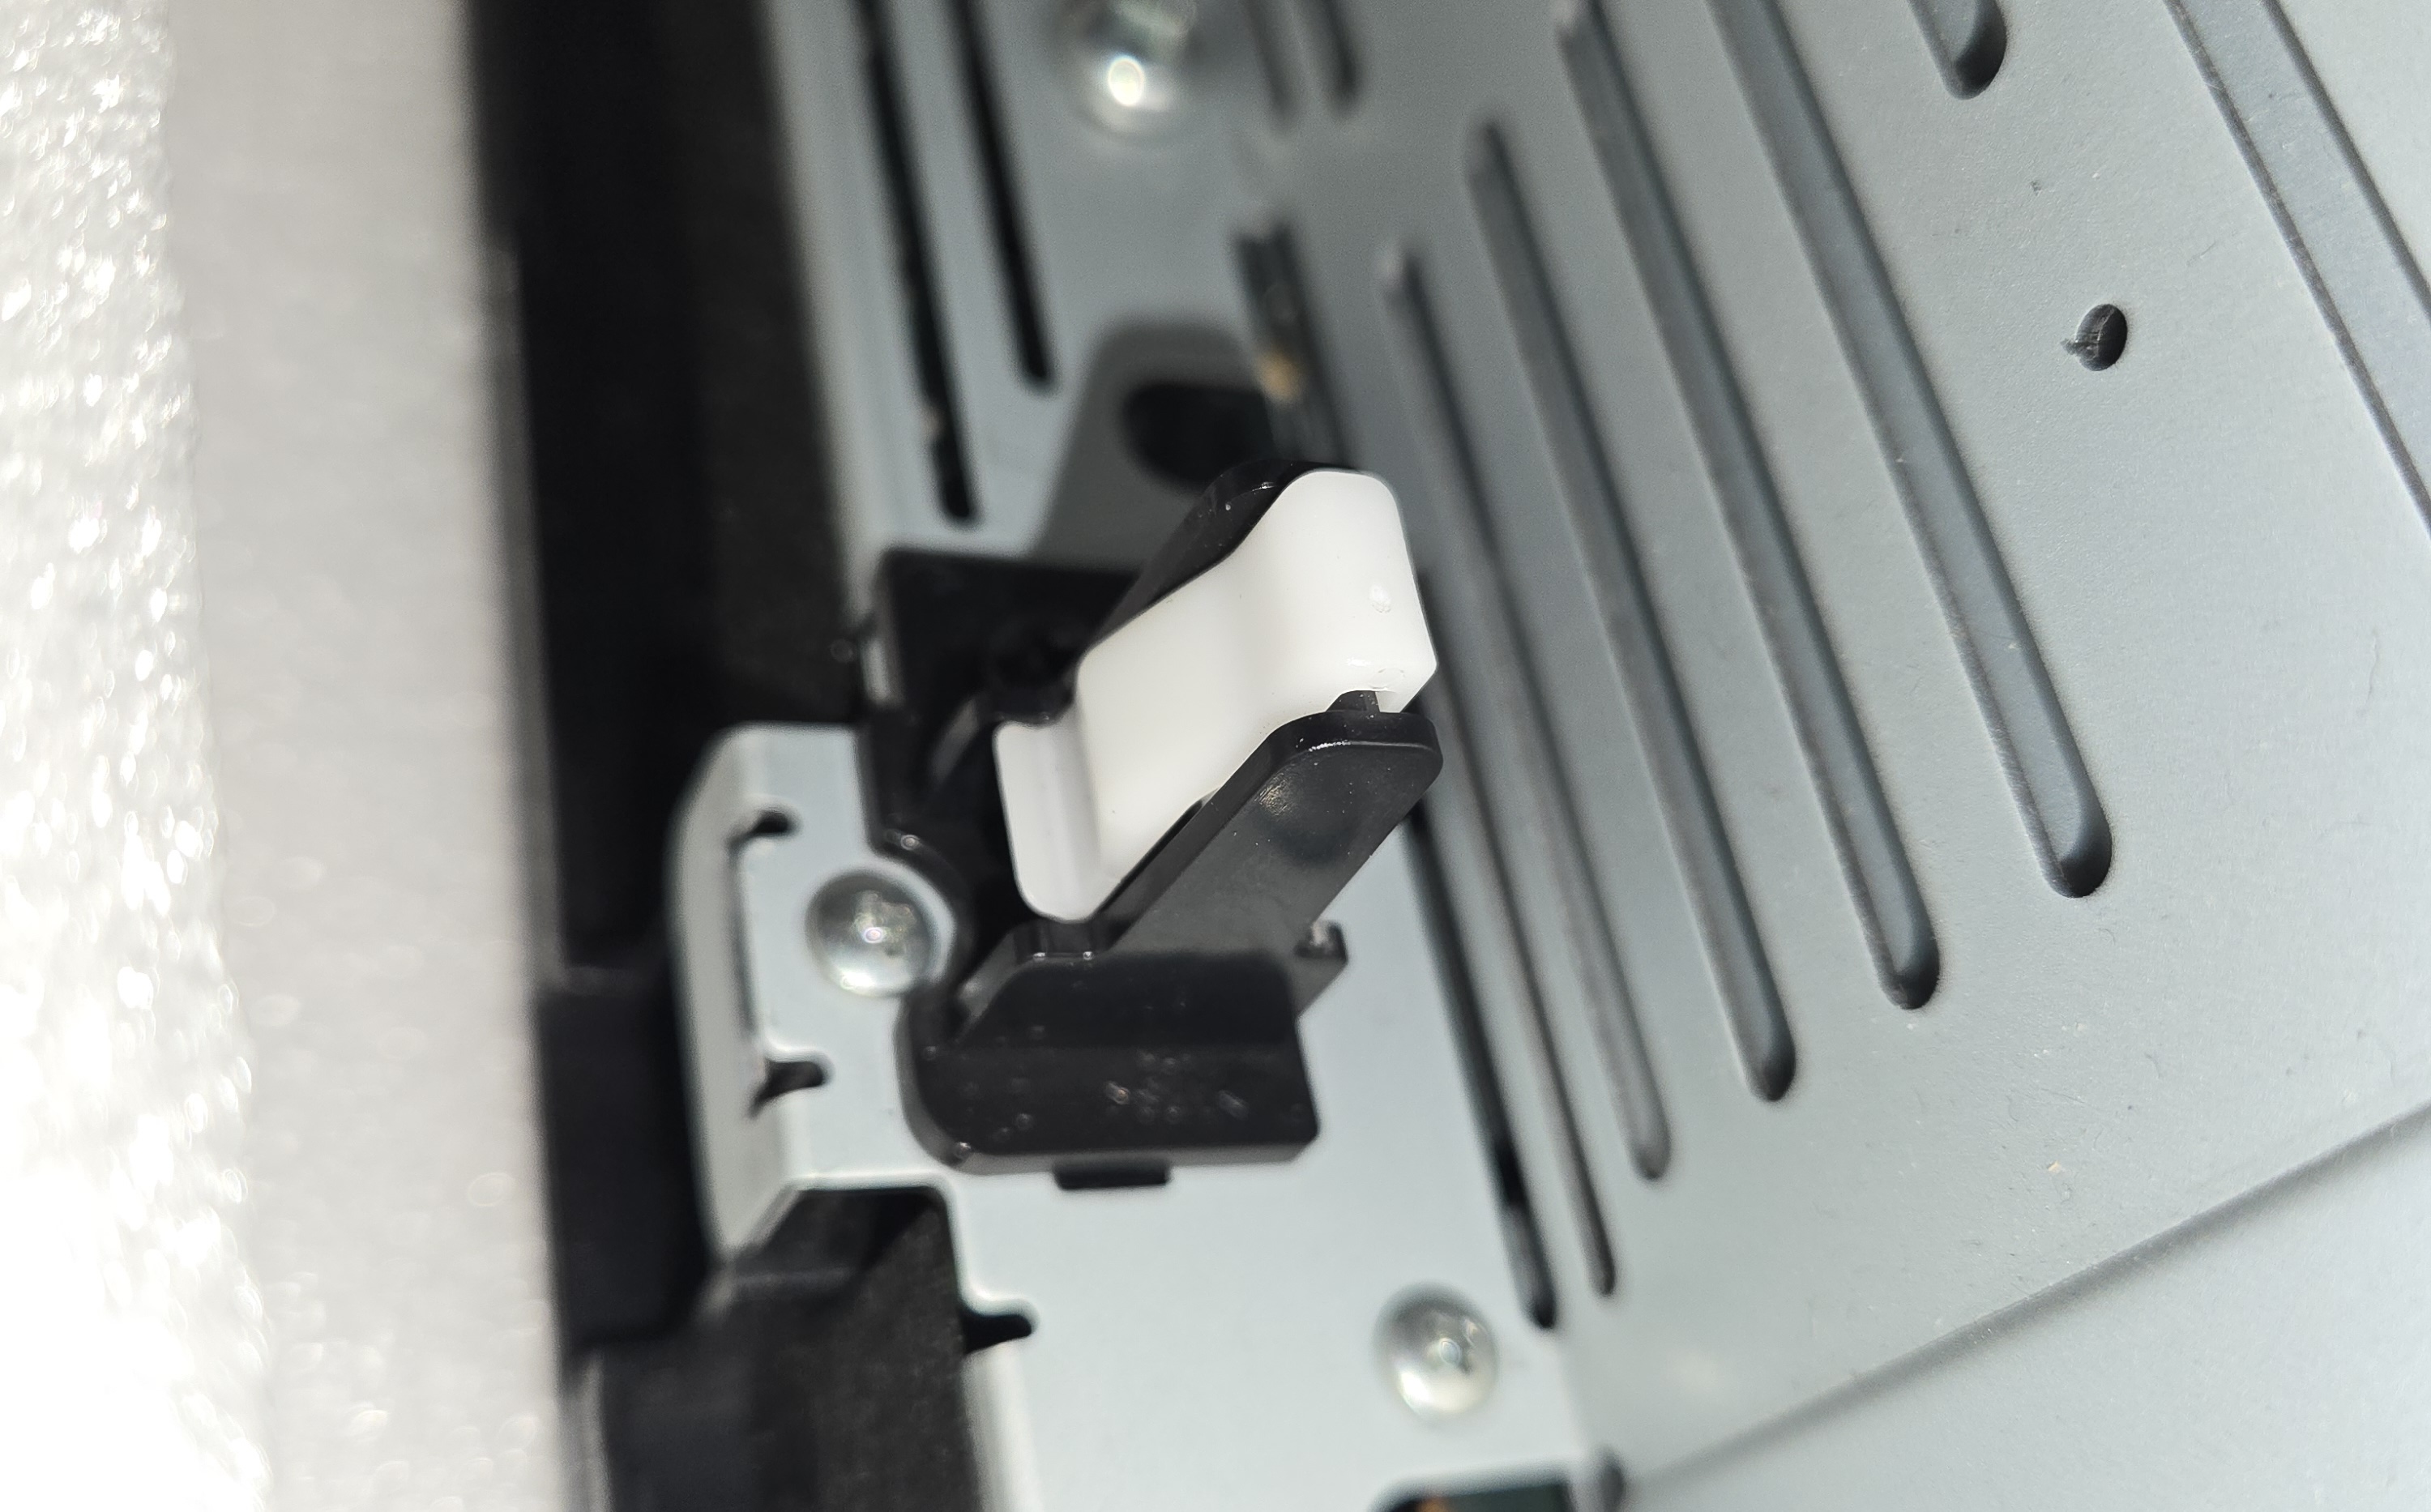
Retaining clips
This is a step I didn’t find written down anywhere, but is crucial to ensure the head unit doesn’t pop out when you start driving (ask me how I found this out).
On the OEM head unit, there are five white clips that sit over the tabs which used to secure the unit in place. You will need to remove these and add them onto the four posts which the new unit has:
- Top left
- Top right
- Left side towards the bottom
- Right side towards the bottom
The OEM unit has another one in the top center, but on my new head unit, there was no post for it, so I left it where it is.
You can remove these, gently, using some narrow flathead screwdrivers or your plastic trim pullers. You want to stick your tool in the bottom left and right of the clips and gently pry outwards and push upwards.
These things like to fly away, so do this slowly. This worked well for me:
- Insert a small flathead screwdriver / thin trim puller on the inside-side of the clip and pry outwards to free the little plastic tab. It should stay in place if you let go, allowing you to work on the other side.
- Insert another tool on the outside side and do the same. Don’t push it up yet.
- With one hand on the outside-side tool, and your other hand lightly gripping the top of the clip so it doesn’t fly away, start to pry and push the clip upwards. It should come free without disappearing into the void.
With four clips now in your possession, slide these onto the new head unit in the four positions noted above. You may need to spread them open to attach properly. They might not sit perfectly flat, but as long as they don’t fall off, this is good enough.
Installing the new head unit
With everything transferred and connected, you can return to the car and start the installation process. It’s basically the same steps as above but in reverse, so I won’t recap it all.
These are the main steps:
- Position the new head unit in the center console, but don’t push it in. Leave enough space to get your hands in to grab the connecting plugs
- Feed in any wires you have, for example, the 4G antenna, the GPS antenna, SIM Card tray, USB port wires, into the center console. I routed the 2x USB connectors to the passenger side behind the glove box for later use, and the rest over to the drivers-side.
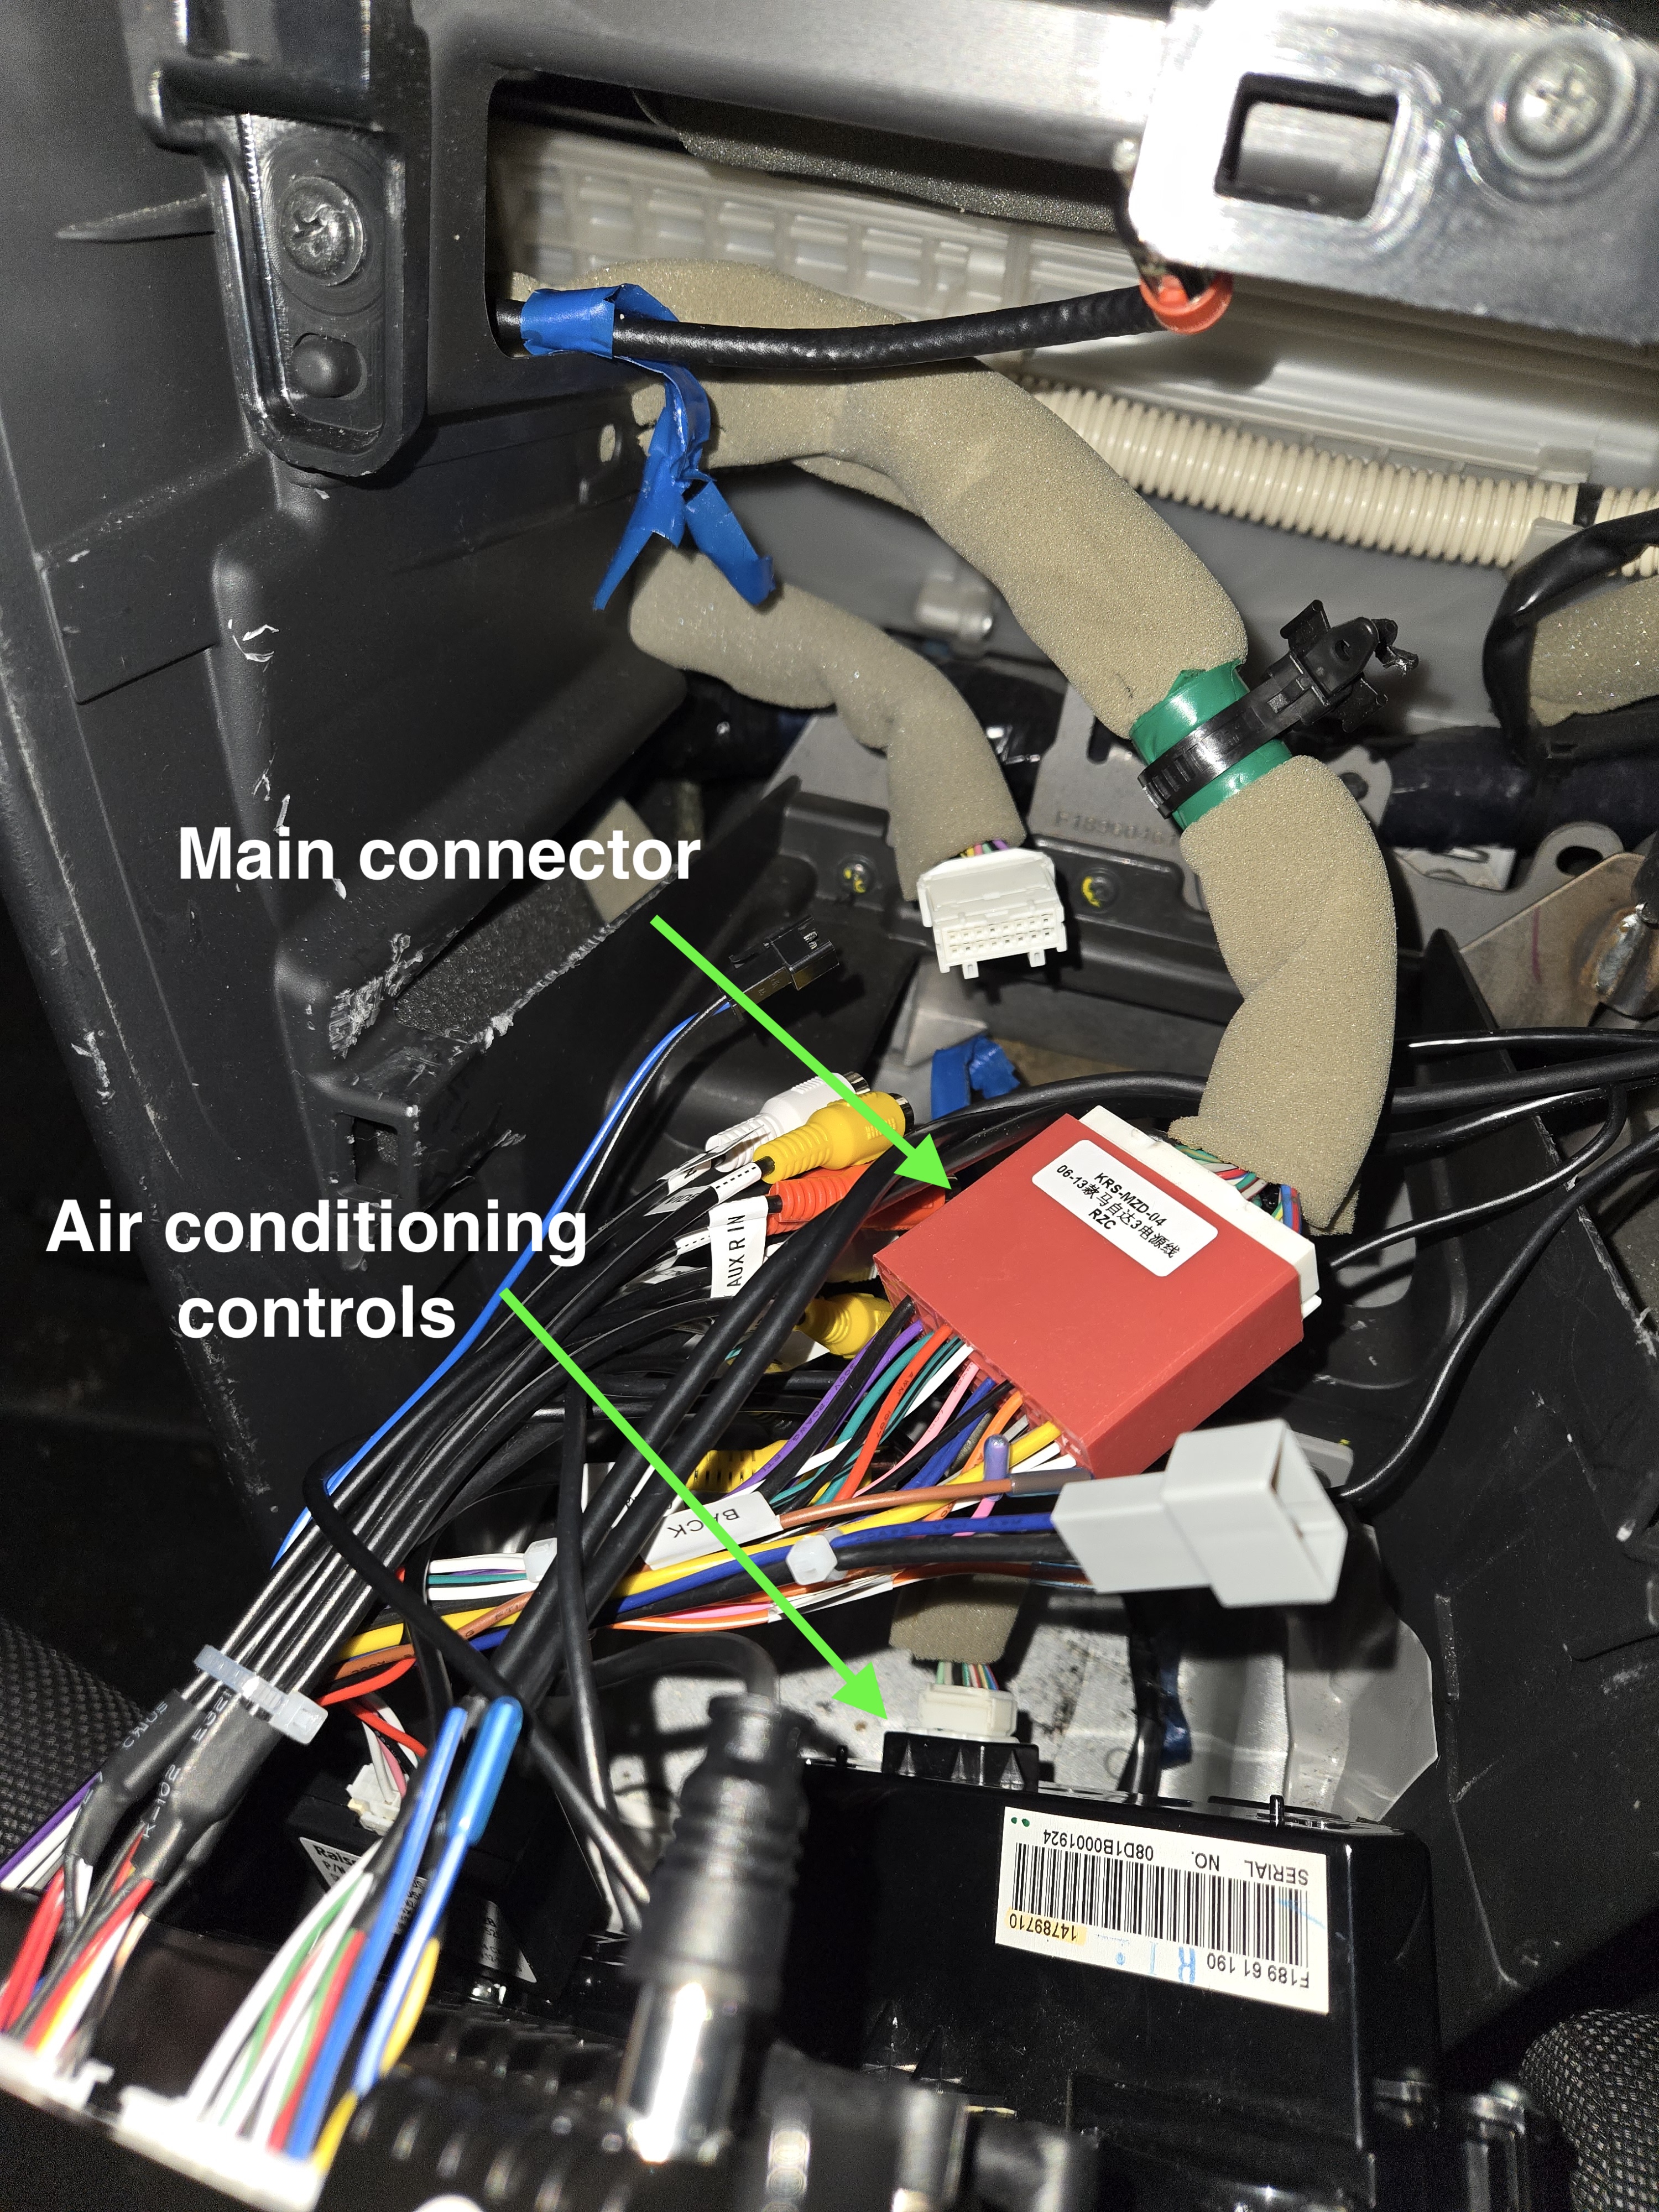
- Connect the main loom (the flat and wide connector) to the top of the head unit.
- Connect the air conditioning loom to the bottom of the head unit.
- The antenna cable and the other white plug can stay disconnected, as shown below.
- At this point, it’s a good idea to turn the car on and make sure the unit powers up correctly, and your air conditioning controls work as expected.
- I also spent a bit of time connecting my phone to make sure I could play some music. If something doesn’t work, double-check you’ve connected the plugs correctly.
- I found at this point the audio was LOUD, so turn it down before playing something! (More on this later)
- If all is well, turn the car off. Now, push the head unit in to the center console, ensuring the clips hold it in place.
- The top of the unit should be aligned with an even gap along the top.
- Re-install the two screws at the base of the unit, below the air conditioning controls.
- Re-install the ashtray, ensuring the courtesy light is re-inserted and the plugs for the cigarette lighter are reconnected.
- Screw the ashtray back in with the two screws.
- Re-install the plastic trim holding the gear shift boot. This may require some maneuvering, but should click into place.
- Re-attach the gear knob.
- Under the steering wheel, route the cables wherever you like and secure the GPS and 4G antennae with the supplied sticky pads somewhere out of sight.
- Re-attach the trim you removed from underneath the steering wheel.
You won’t be needing the 10 mm bolt you removed previously, so you can add this to your stash. Maybe also make sure you put your 10 mm socket away safely before it disappears for good.
Steering wheel controls
This was the most exciting bit for me, mapping the controls on the steering wheel to actions on the head unit.
Start by heading to the Settings menu and find the CANBUS settings. You can also do this from the Factory Settings, which I will talk about later.
Configure the CAN Bus settings by picking the make, model and year.
You can now tap on a function, then press the corresponding button on your steering wheel that you want to map to that action.
I mapped the volume and skip buttons, as well as mapping the MODE button to toggle mute.
After configuring this to your liking, you’re all done!
Fixing the audio
You may have noticed the audio was very loud. I’m still waiting to hear back from Seicane support about it, as they vaguely mentioned connecting an “amp cable”, however, there was no obvious “plug and play” thing I needed to do for this, so this was my solution.
From my research, the head unit amp and the Bose amp in the RX8 don’t play nicely with each other, and the signal seems to get double-amplified. This results in the volume increments going from muted to unbearably loud at one volume.
To address this temporarily until I get some info from Seicane, I accessed the Factory Settings and made some tweaks.
Accessing the Factory Settings
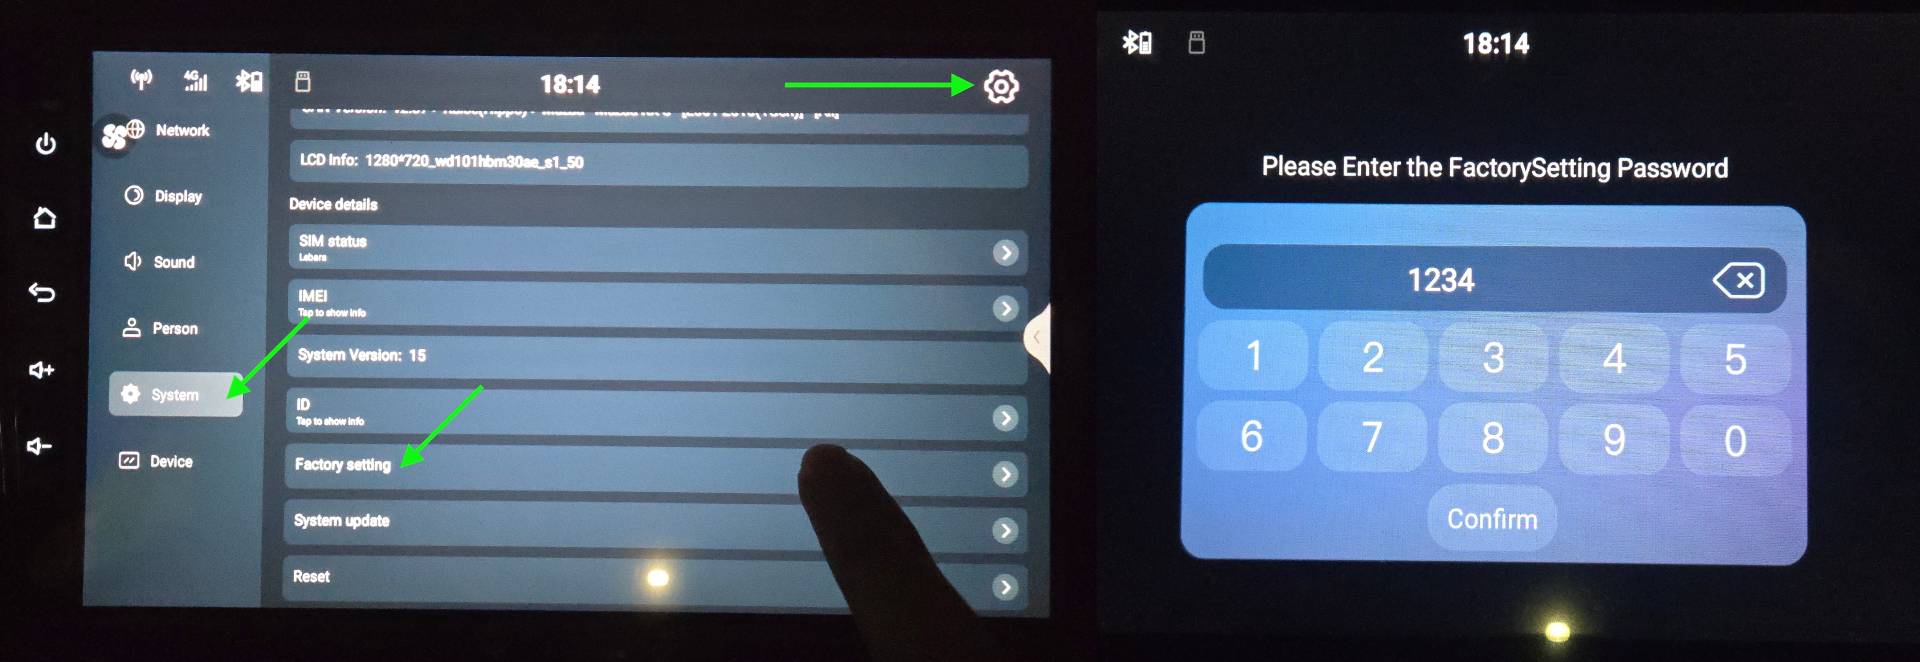
These can be accessed by going to the Settings menu, then tap on Device. Next, find the “Factory Setting” option and tap on it.
You should then see a password entry screen. This is something set by Seicane, and the code that worked for me was simply 1234.
Tweaking the gain settings
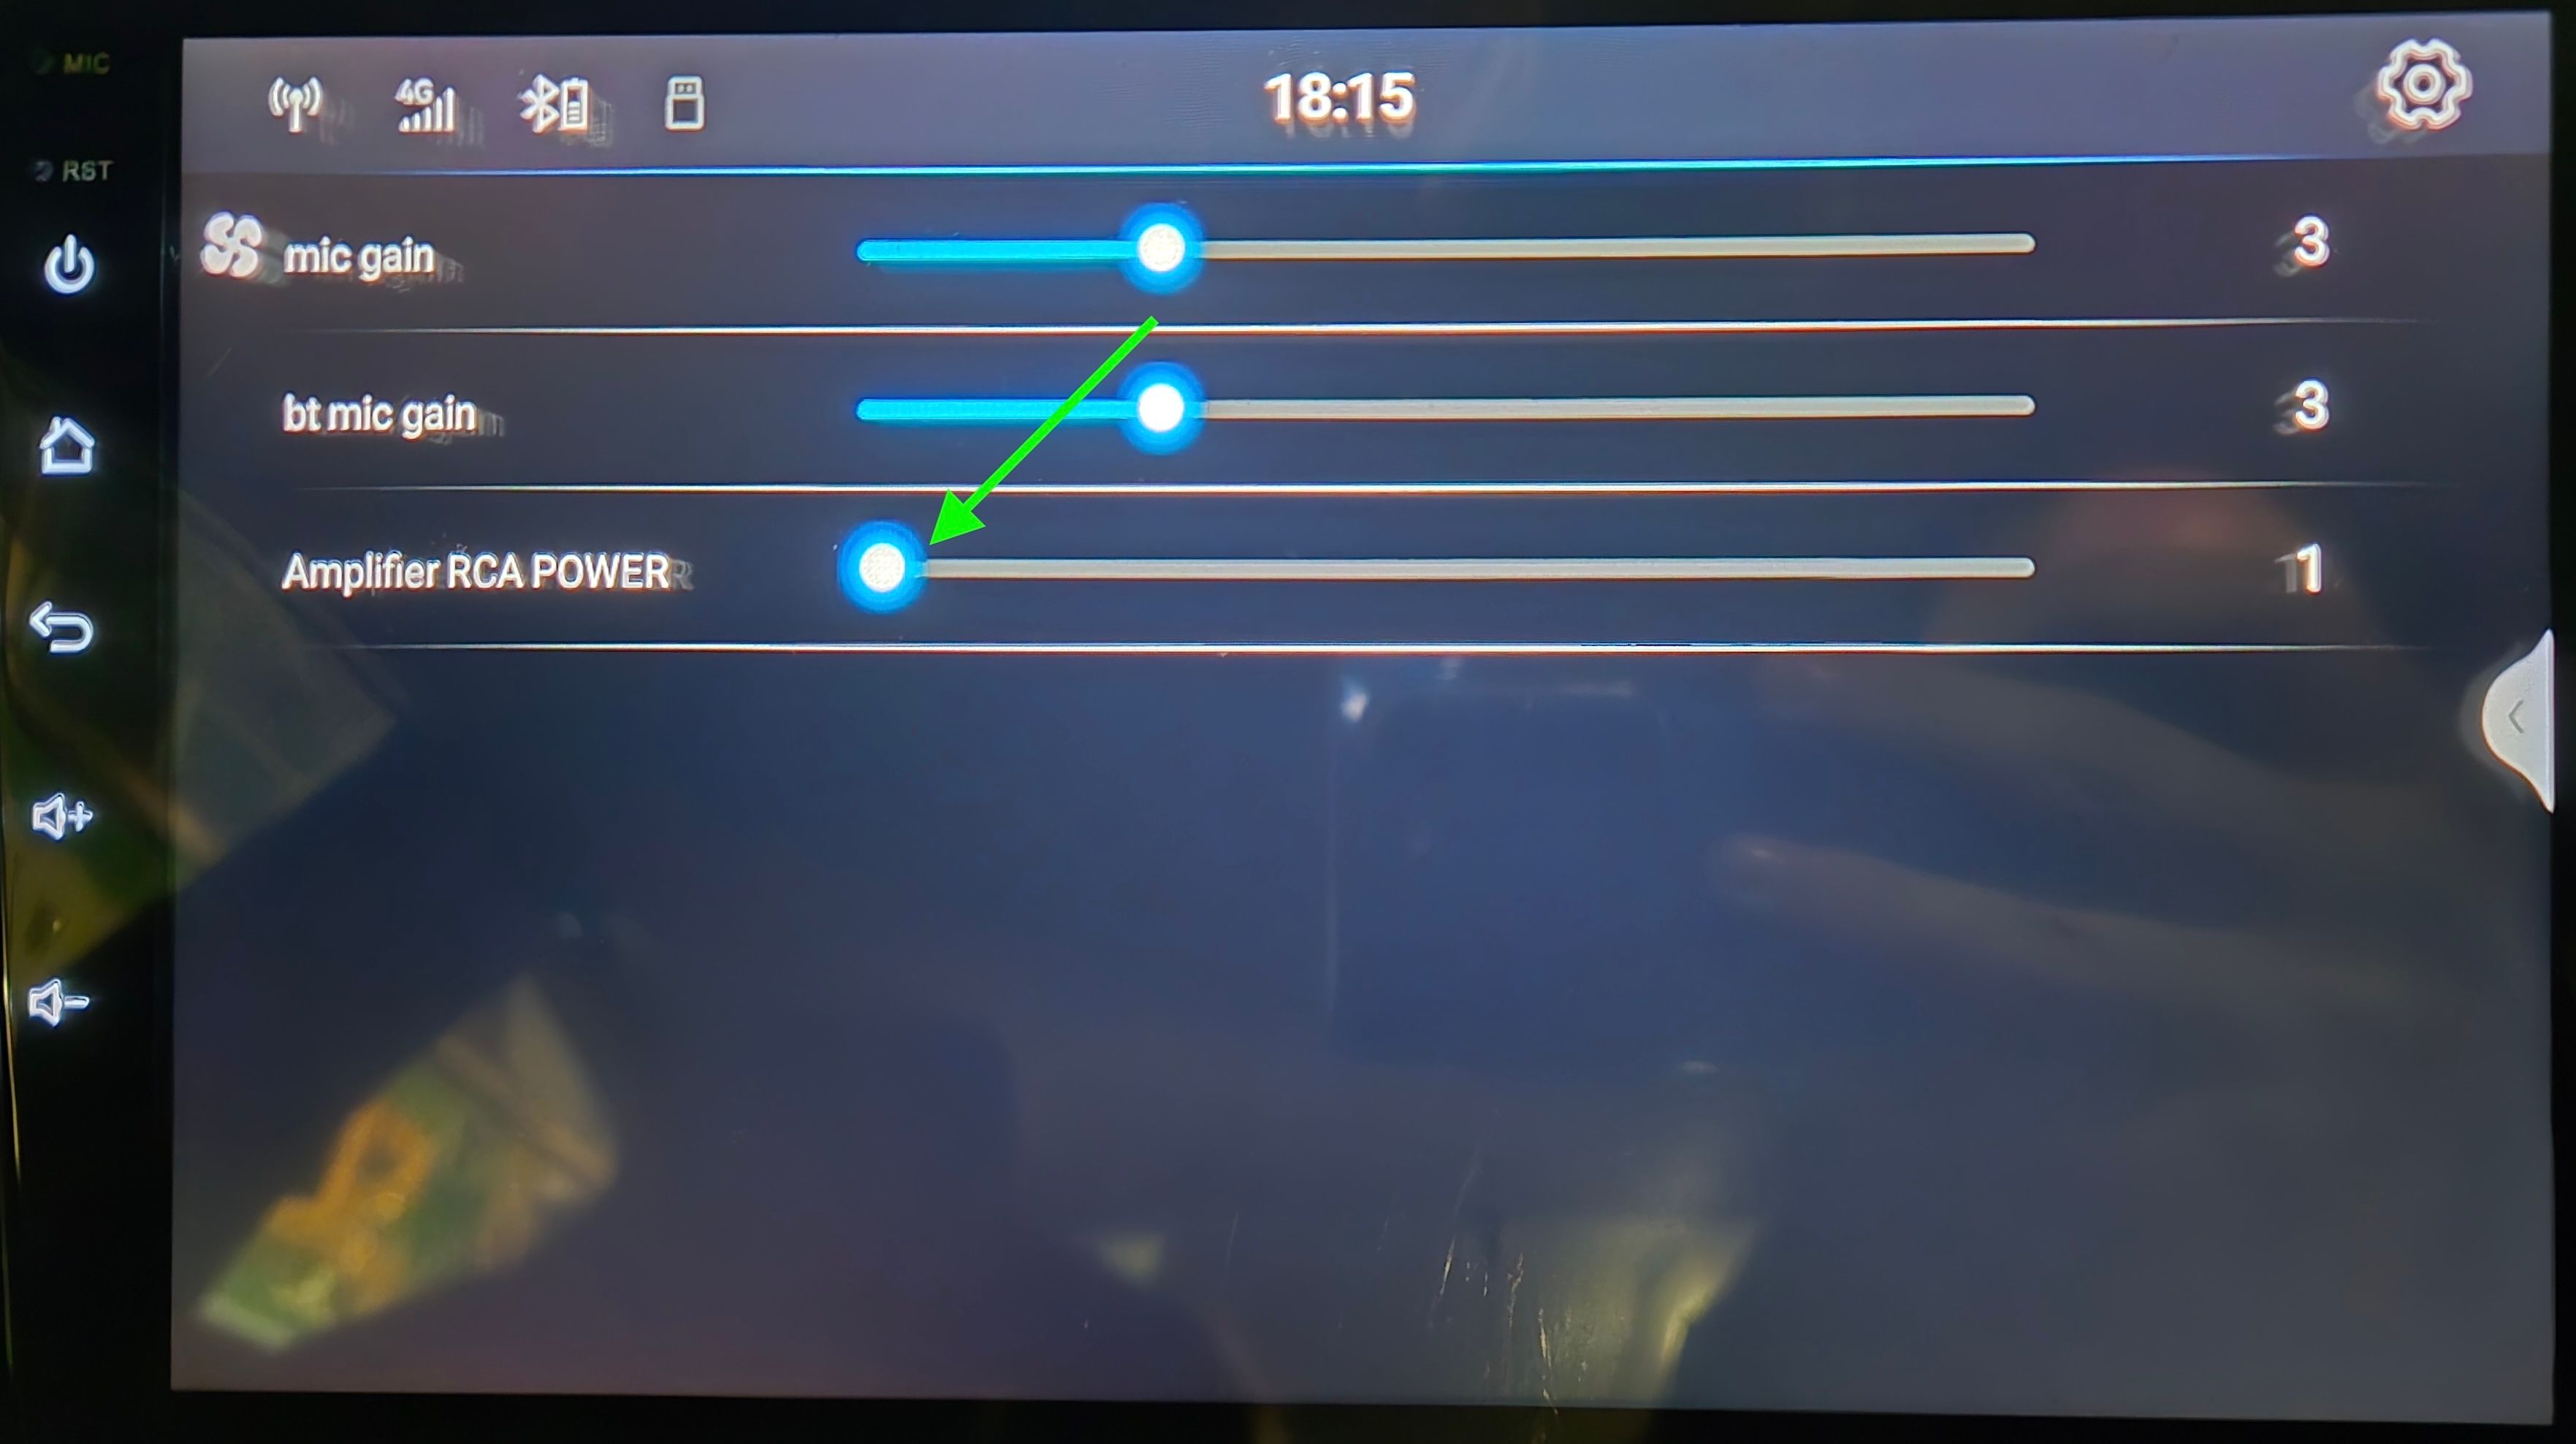
After gaining entry, head to the Gain settings.

From here, I turned down the “Amplifier RCA POWER” setting to 1.
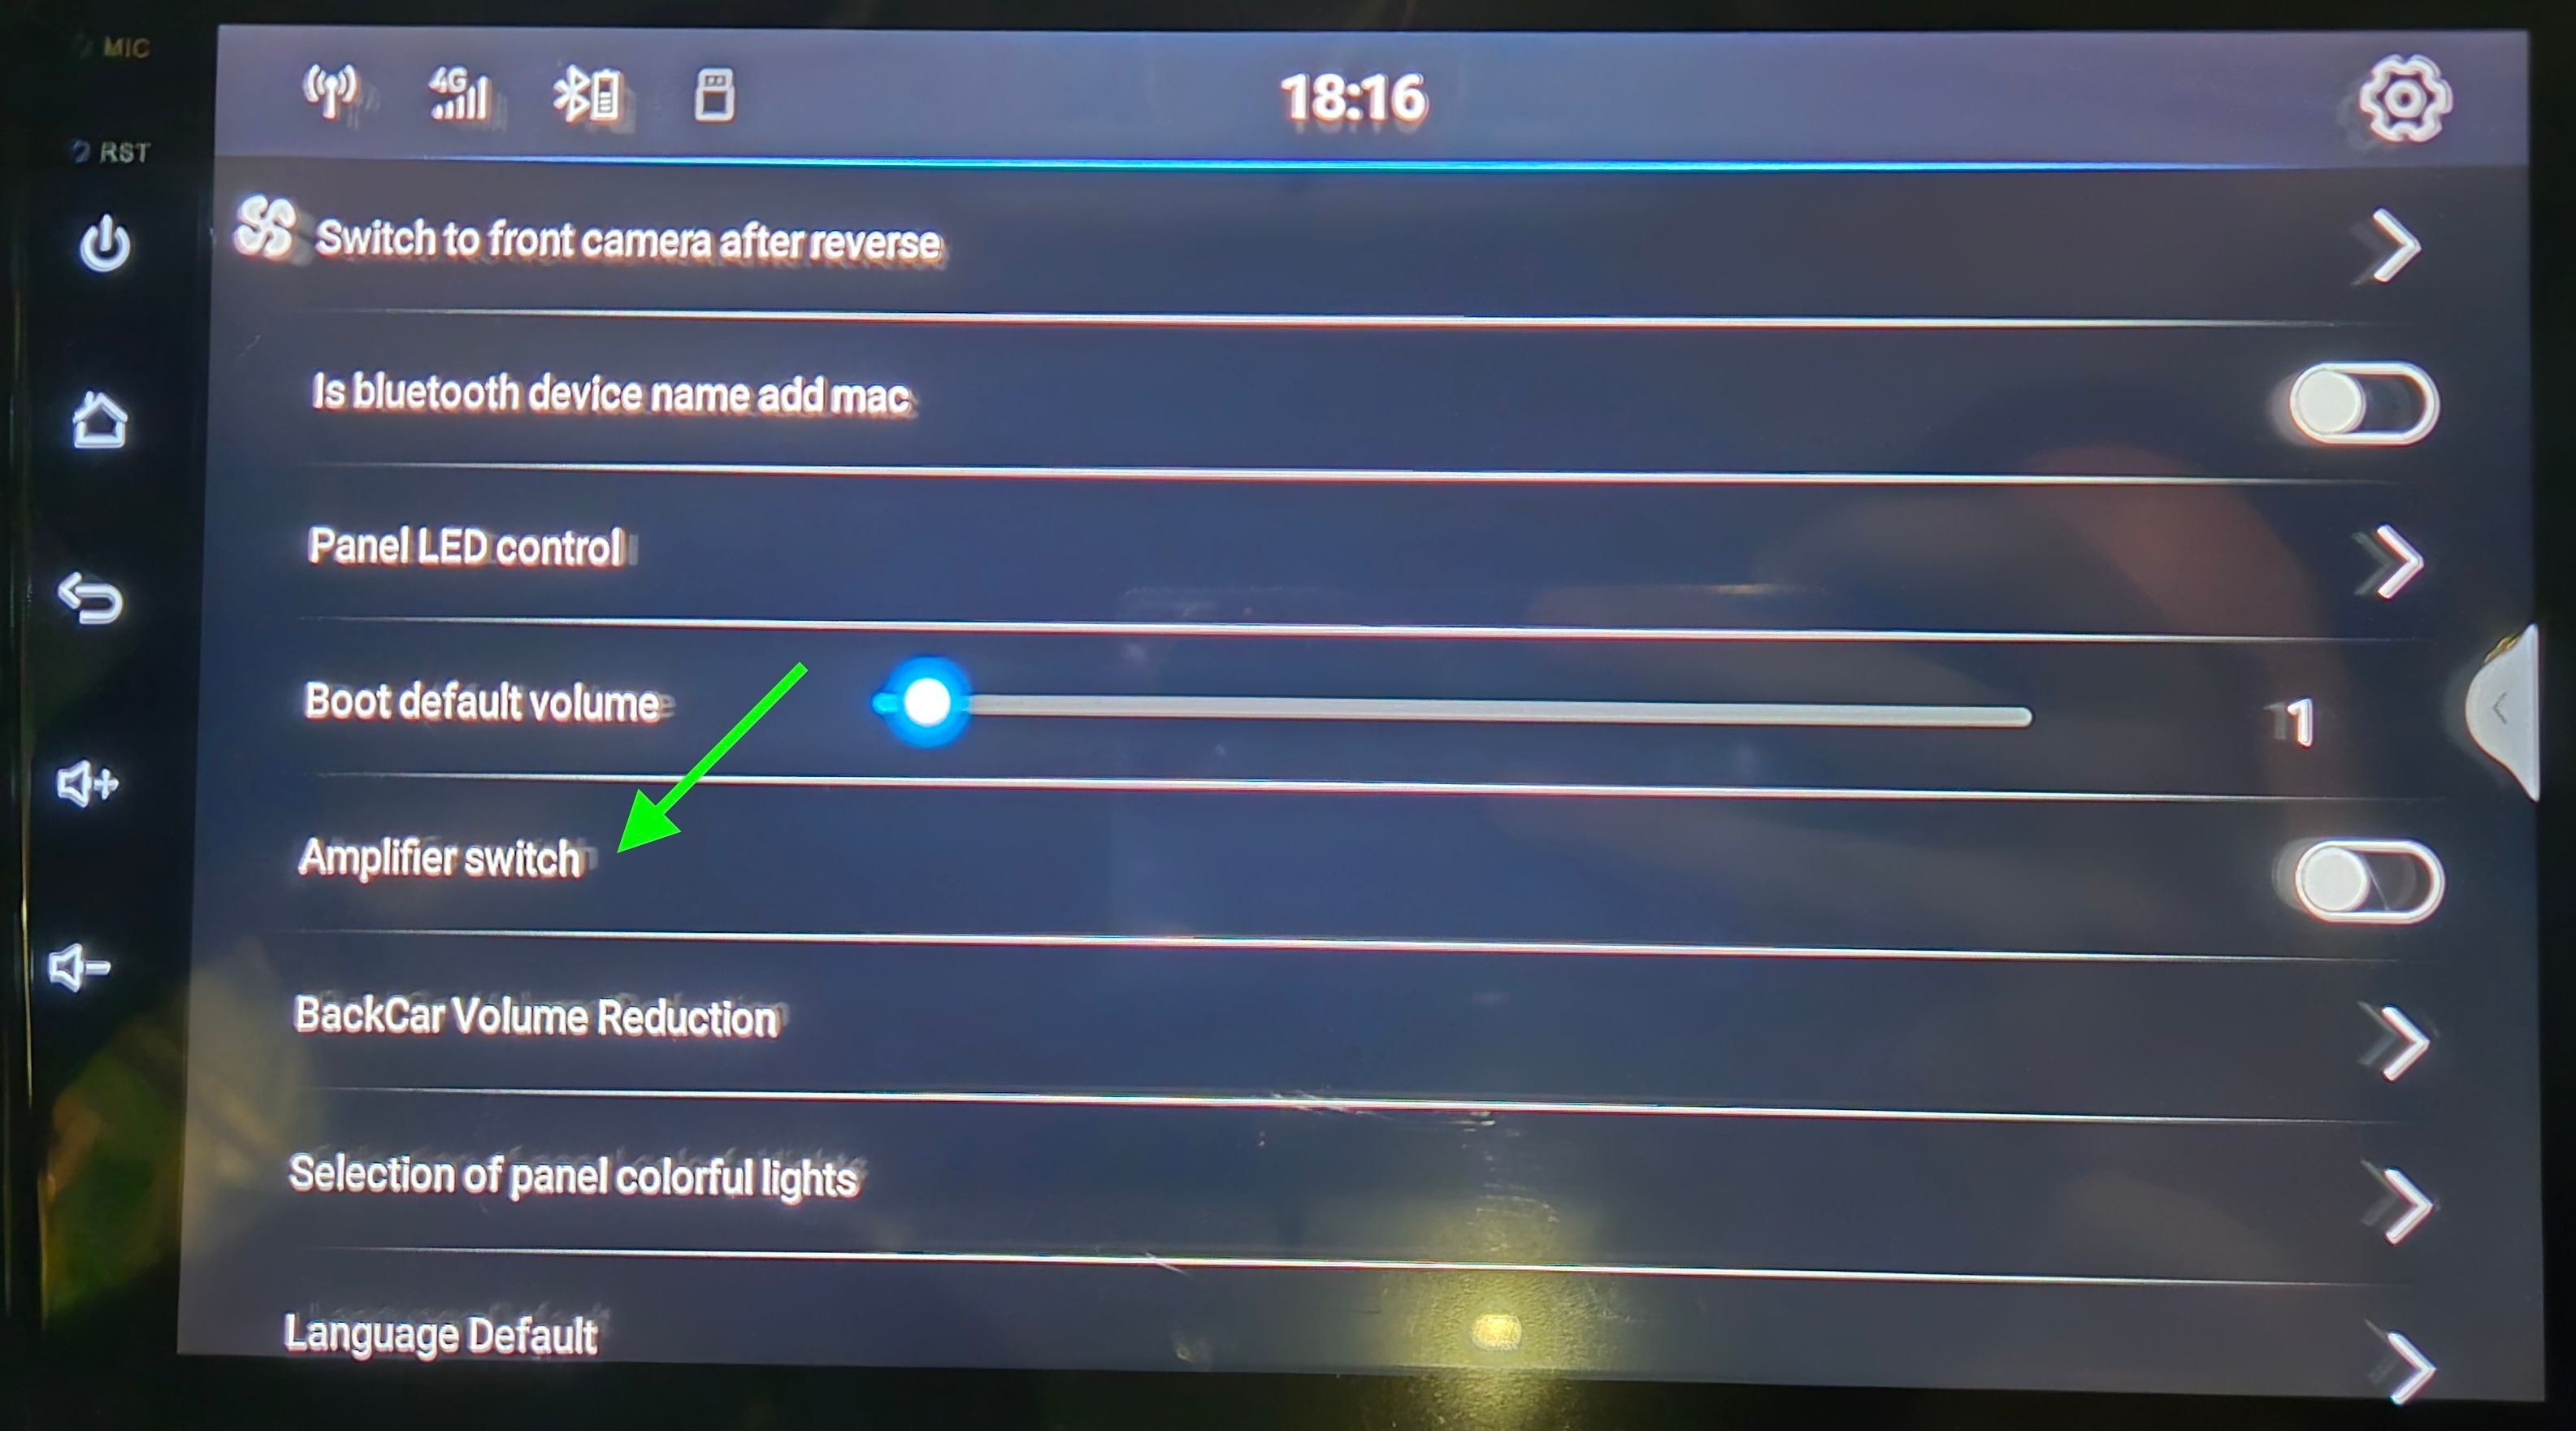
Next, I also turned off the “Amplifier Switch” setting in the “Other Setting” section, which seemed to help too.
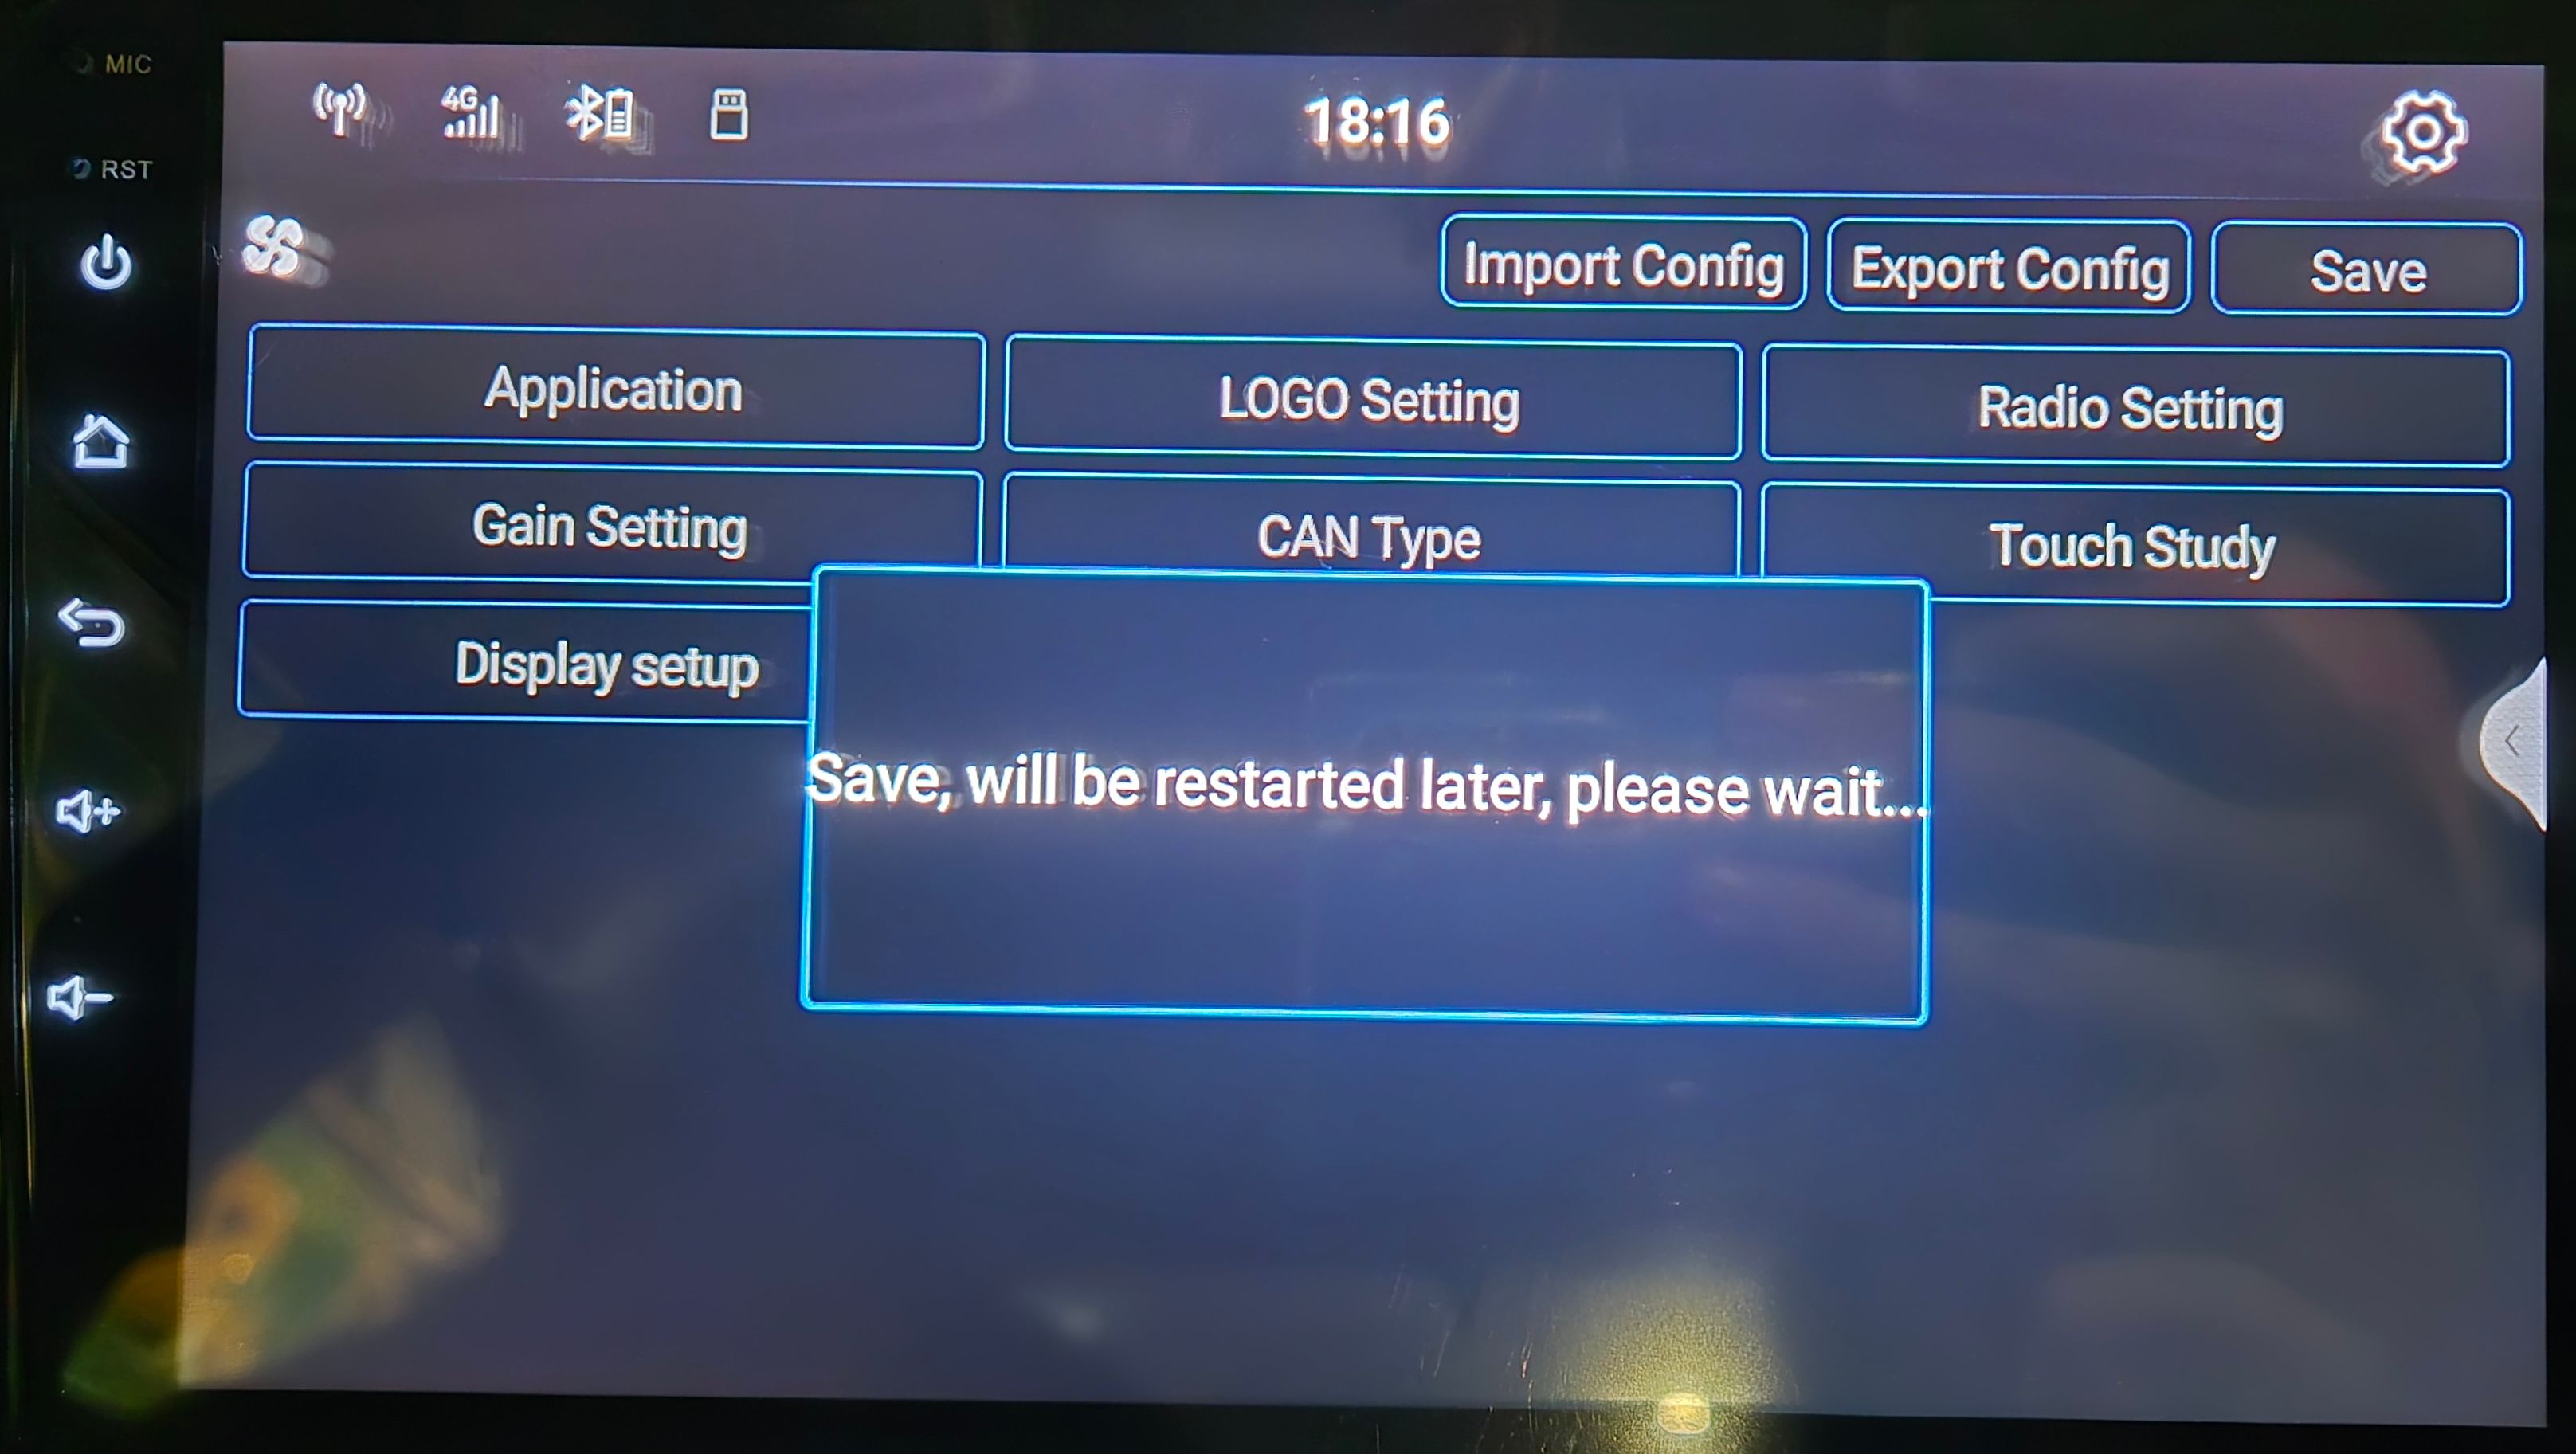
Now, I headed back to the Factory Settings main menu by tapping the back button, then clicked on Save.
After saving, the head unit will restart and your volume should be much more tolerable.
I still noticed a hiss audible through the speakers, so I’m waiting on some more info from Seicane to figure out the correct solution.
All done!
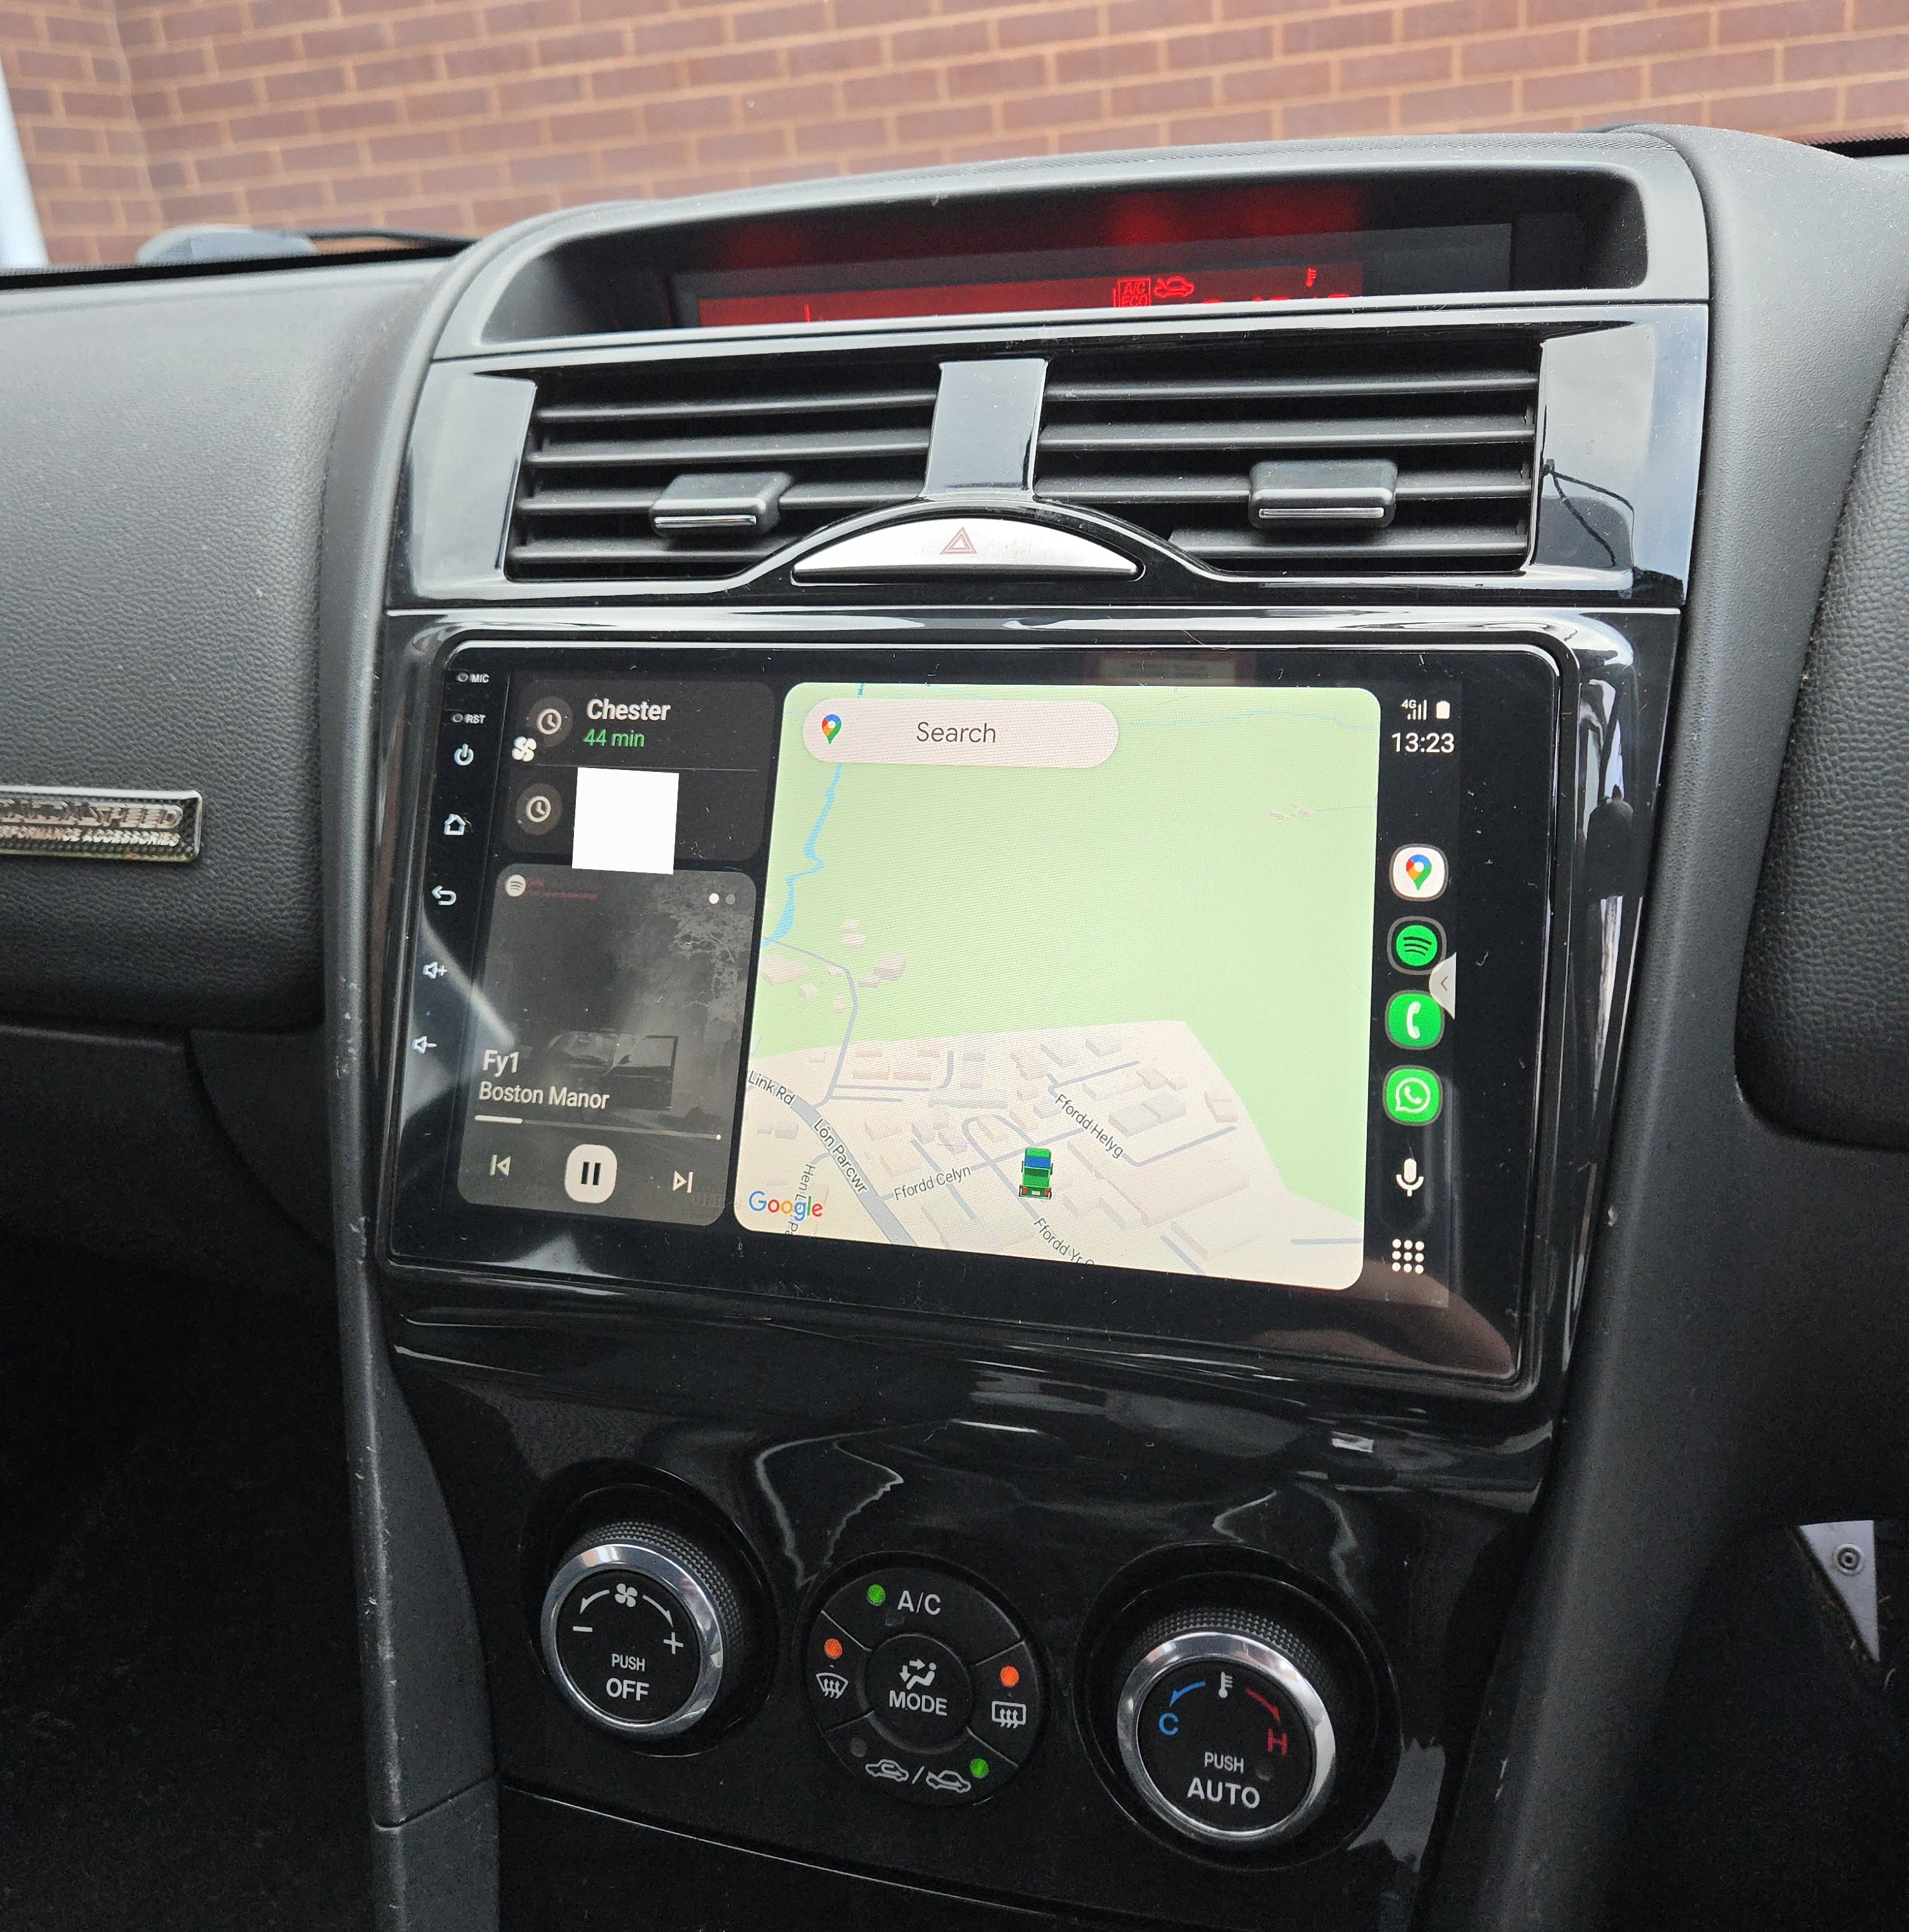
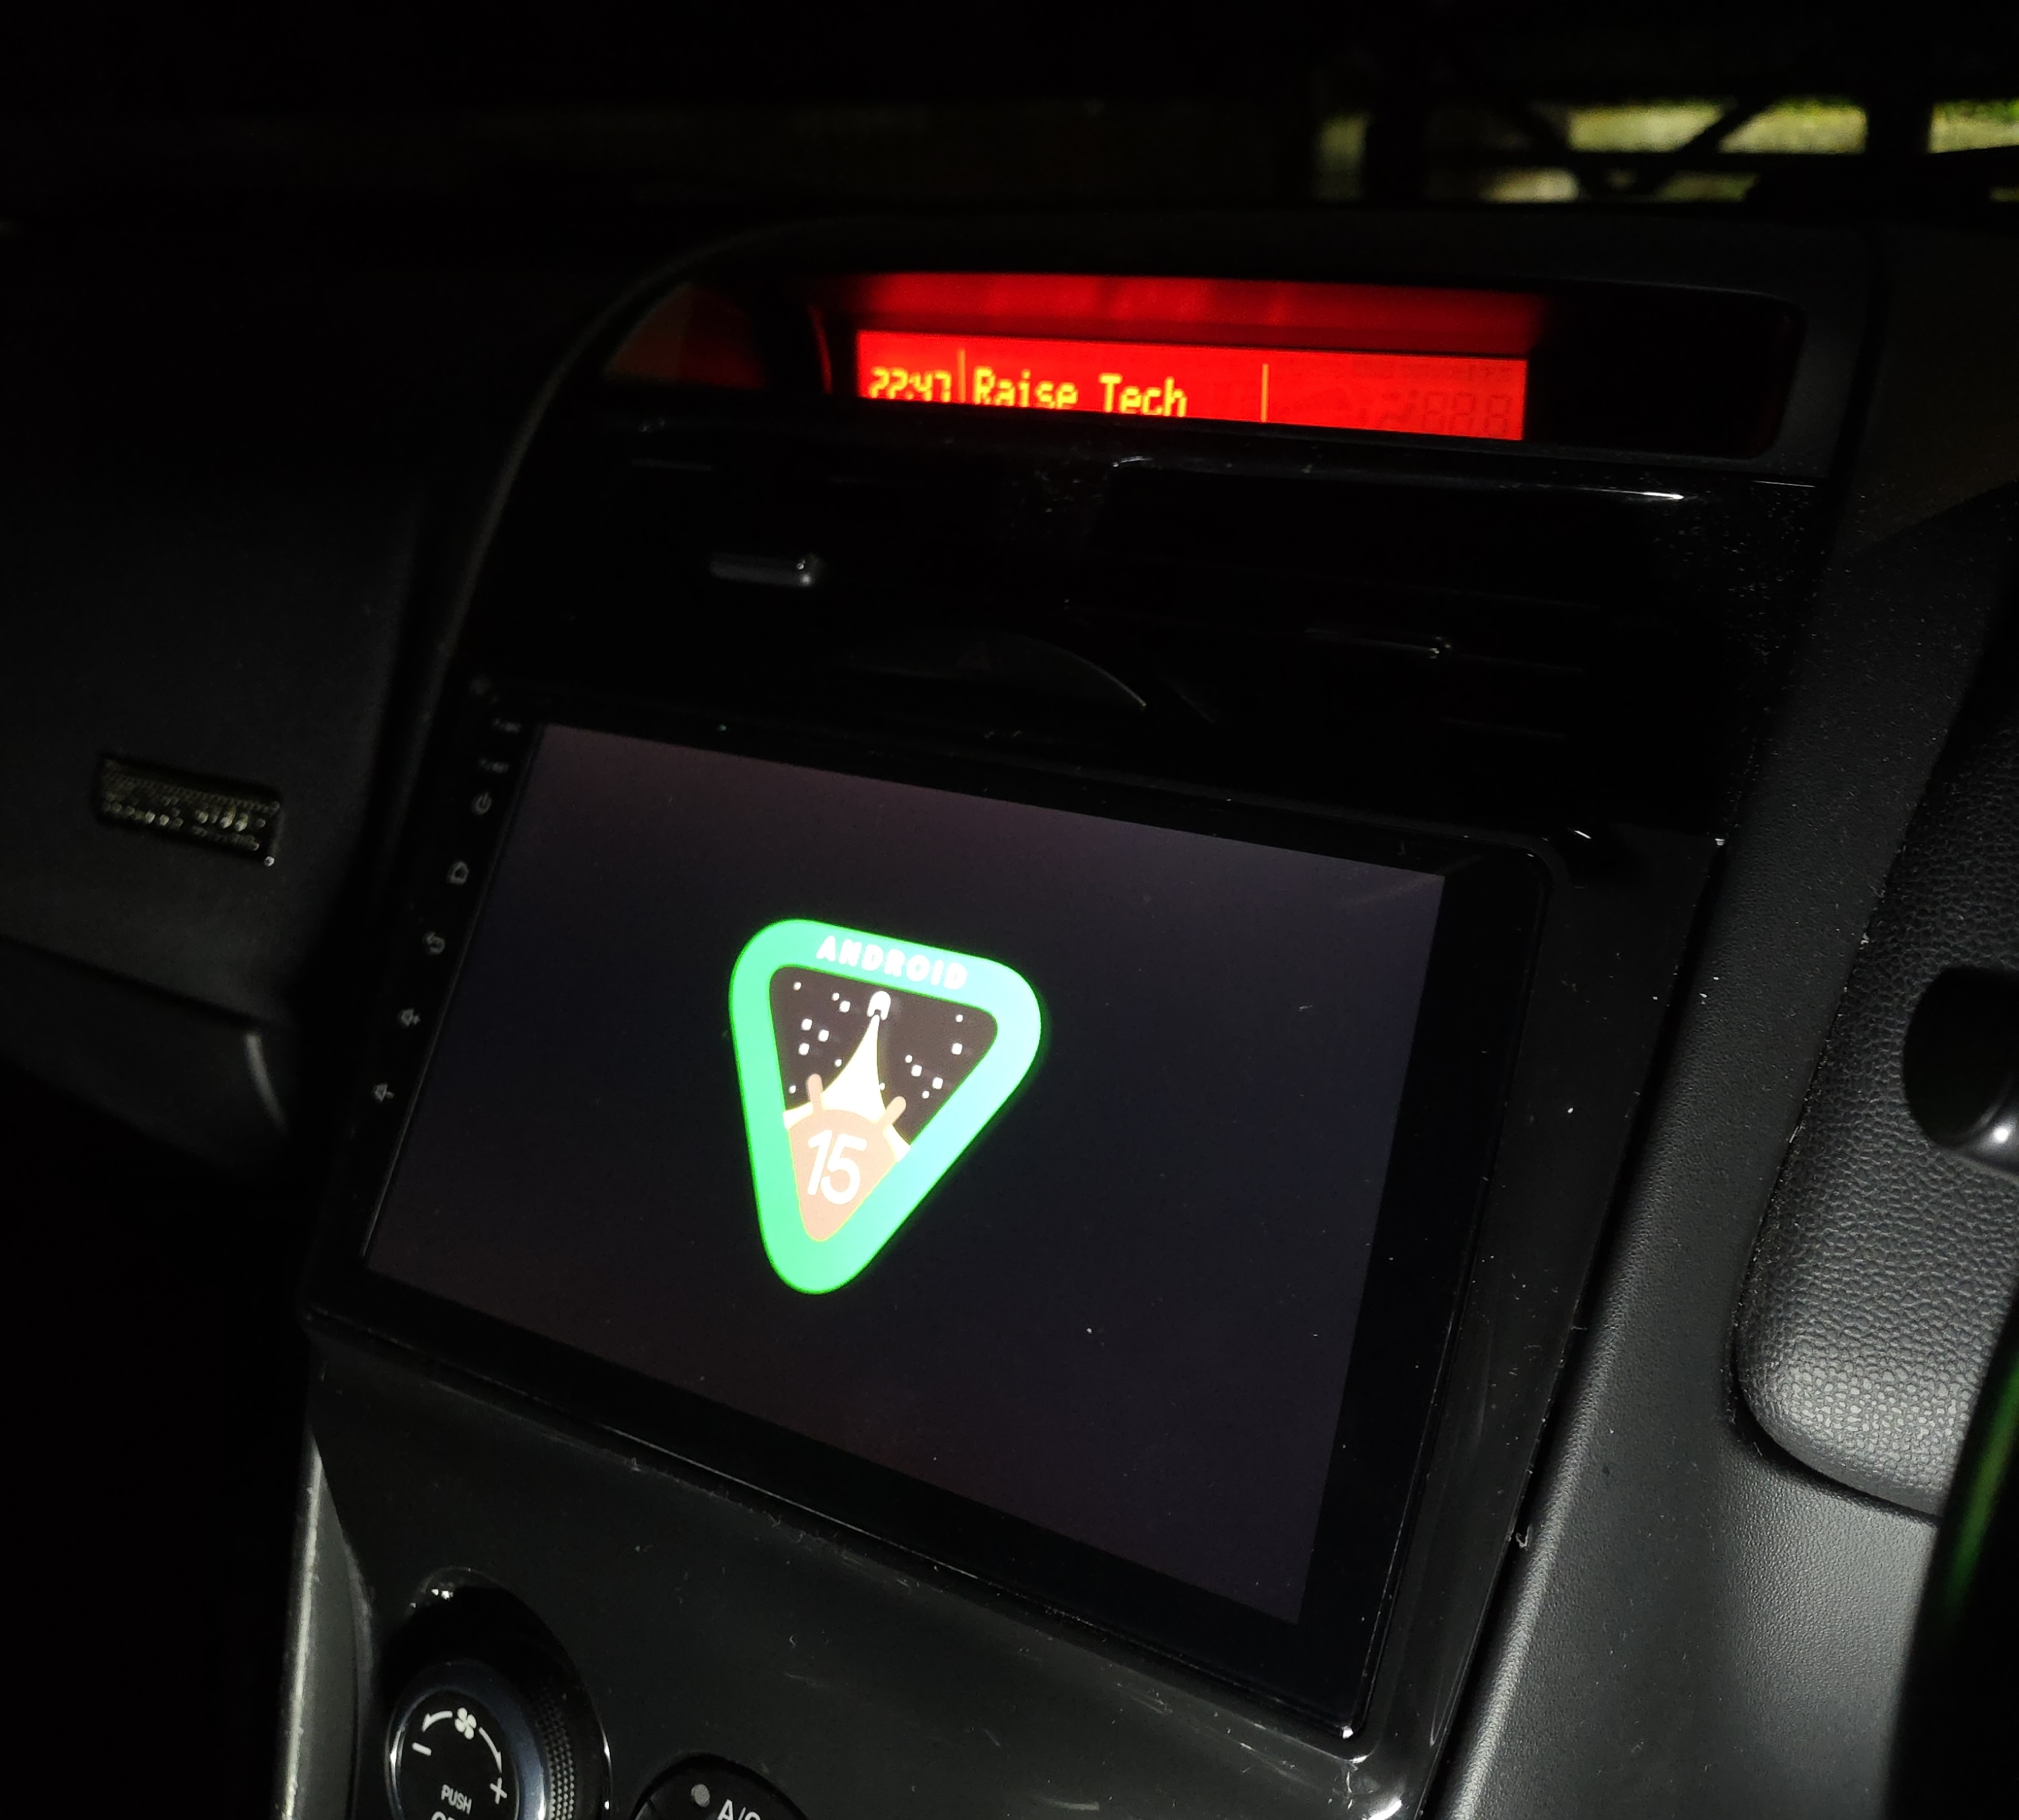
At this point, you should have a fully functional Android Auto or Apple CarPlay experience in your Series II Mazda RX8. It’s already been a huge improvement, bringing the RX8 into the modern era.
I also have a reverse camera to install for more futuristic goodness, which will require some 3D printing and some actual wiring to do, which I’ll probably write about when I’ve figured that out.